Professional photographer Rob Hanson has taken the time to create a detailed video tutorial to teach viewers how to make HDR photographs. The five part video series below exams the editing process from start to finish. Hanson takes a set of three identical photographs at different exposures and combines them to create one perfectly exposed image. He uses a variety of programs throughout the series to create the finished product including Adobe Photoshop and a collection of plugins and filters to accompany it.
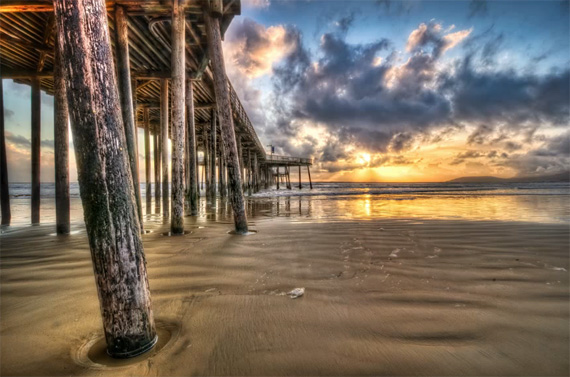
How to Create This HDR Photo (Video Tutorials Below)
In the first video, Hanson employs Photomatix to merge the three original files. He prefers to work with Photomatix’s default settings and make adjustments as needed, which he goes through in great detail.
Hanson begins the HDR processing by introducing viewers to de-ghosting and the process of tone and shadow mapping. The histogram is introduced during this section of the tutorial and we are taught how to create contrast by adjusting the black and white points. Grain and noise are also fixed during this stage of the editing process. View part one of the series here:
Video number two shows us how to combine different edited versions of the photograph, bringing out the strong points in each edit. Layer masks are introduced here, which will be used extensively throughout the remaining four videos. In this particular segment layer masks are used to fine tune contrast and exposure.
Next, we learn to eliminate any color fringing that may be apparent using two different methods. Hanson stresses the importance of using precise selection methods when completing these steps to reduce discoloration in areas that do not need adjustment. He also shows us a pair of methods to eliminate noise and grain. Another Adobe Photoshop plugin, Noiseware, is used to expedite the procedure. While Hansen speaks highly of the plugin, he warns photographers to avoid over applying the plugin on objects that are naturally grainy such as wood or rust. He uses a layer mask to apply the plugin’s effects to selected areas.
To make adjustments to the tonal contrast and overall depth of color, Hanson brings in Nik Software’s Color Efex Pro, another essential Photoshop plugin. Special attention is payed to Color Efex’s Glamour Glow filter, which is used in this example to give the landscape a warm glow. Minor adjustments are made to the saturation levels of specific colors and the importance of using the rule of thirds grid during cropping is stressed. A working copy is saved as a layered TIFF.
Wrapping things up in the final video of the series, we are shown how to apply a highly customizable vignette, again using Nik Software’s Color Efex Pro. He goes through the process of applying the Lighten/Darken center filter and how to apply it to achieve different results. Finally, the benefits of using output sharpener is explained.
For Further Training, PictureCorrect Suggests:
Like This Article?
Don't Miss The Next One!
Join over 100,000 photographers of all experience levels who receive our free photography tips and articles to stay current:



A great HDR tutorial, very much appreciated. I learned several techniques that I can employ, thanks for the tips.
Great HDR tutorial – and for free. I was especially impressed by the shadow-mapping technique which I had always wondered how people like Trey Ratcliffe, Cedric Mayence and Mike Savad – to name but a few – could get such striking shadow-work into their HDR flow. The defringing as well will now become a central element of my HDR workflow, and I am able to adapt the Nik technology to my preferred Topaz range of plugins (you were right, the Topaz example displayed was not the right way to do Topaz at all!) All in all a fantastic, clear, and comprehensive tutorial – I shall thoroughly reccommend it to my fellow PhotoShop and Topaz users…
@Memoriso: To merge all visible layers into one ‘consolidated’ layer, select the layer at the top of the layer stack and press Command + Shift + Option + E (Mac) or Control + Shift + Alt + E (Windows.) I’ve programmed a button on my Wacom tablet to do that sequence with one click.
Cheers,
Rob
A really great tutorial! Thanks a lot for sharing.
A great HDR tutorial. Thank you Rob for taking the time to show and explain your technique.
One question : how do you merge all the layers in one without removing them ? can’t find the way to do that as you do
Really complete tutorial, thanks for this !!! Great job Hanson ! :-)