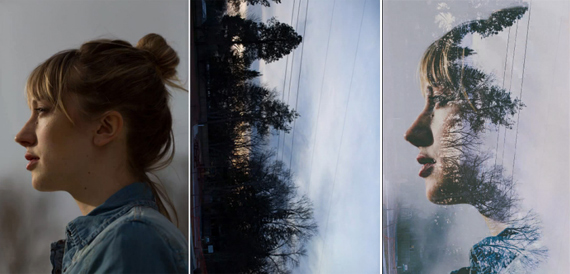
Multiple exposure is a technique that many film photographers discovered by complete accident – either the camera broke and the film didn’t advance, or they shot the same roll twice by mistake. Once you realize how two (or more) frames blend together, you start to realize the almost limitless experimental possibilities allowed by this technique. In this video, photographer Sara Byrne describes how she creates double exposures on her Canon 5D Mk III:

Almost every modern DSLR will have the ability to do multiple exposures, though they may not all be as advanced as the 5D Mark III; check your camera’s manual (or Google) to find out how to set your camera to the proper mode.
Double exposure isn’t the same as overlaying two pictures in Photoshop. The key is shadow – when making a double exposure, the second picture doesn’t fade over the first in its entirety. It will only show through where the first image is dark, and the first image will show through where the second is dark. This is because you are dealing with light as opposed to pigment; a shadow is not casting much (if any) information onto the sensor, and thus will make no impression. When the second exposure is made, the light from it will fill in that lack of information, but will be far less visible in places where the sensor has already absorbed a great deal of light.
As Byrne shows in the video, the 5D has a live view mode which will show the previous image and allow you to visually lay the second shot over the first. If your camera doesn’t have this feature, it may take a little bit of thought to plan how the picture will come out. Pay close attention to where the darkness is, and then reverse it – that is, if you have shadow on the bottom and brightness on the top in photo #1, compose photo #2 with brightness on the bottom and shadow on the top. Play with underexposing certain situations to create dark silhouetted figures which can be laid over textures and patterns.
If you’re stuck for ideas, or if you want to replicate that purely experimental thrill of the original film overlays, do the opposite – turn image review off and don’t plan it out. If you’re just trying to get a feel for the process of double exposures, simply turn the mode on and snap away at a variety of high contrast scenes, only to view the results afterwards. In the full spirit of multiple exposure, you might create something wonderful entirely by accident.
Like This Article?
Don't Miss The Next One!
Join over 100,000 photographers of all experience levels who receive our free photography tips and articles to stay current:


Sara,
Good information but please ditch the music!
Your photos are awesome, thanks for the tutorial!
It is very useful to me to learn something new creativity. I am always ready to do something new creativity.
Thanks Sara for such a great explanation and demo of the technique, can’t wait to try it out today!
I have a K5 and it took a while but I found out how to multi expose and it’s a blast….thanks a lot..(=:
Allmost every DSLR?
I kinda hate to disappoint you, but when it comes to CANON, there is by FAR a majority of hte models that does NOT have the option of multiple of exposure. Sadly :(
For a complete list of CANON models that can shoot multiple exposure, check this list by CANON themselfs:
http://www.canon.co.uk/Support/Consumer_Products/products/cameras/Digital_SLR/EOS_600D.aspx?faqtcmuri=tcm:14-915154&page=1&type=faq