Photoshop has many tools for altering and manipulating an image; some are subtle manipulations, and some are more dramatic. The Puppet Warp tool can be used to directly and intuitively manipulate an image with radical results, as Bryan O’Neil Hughes explains in the following video:
The Puppet Warp tool can be used to drastically alter an image or to make simple improvements. Hughes shows us both methods:
Using Puppet Warp for Simple Changes
For this example, Hughes demonstrates how to straighten the apex of a barn roof.
1. First, create a duplicate of the background layer.
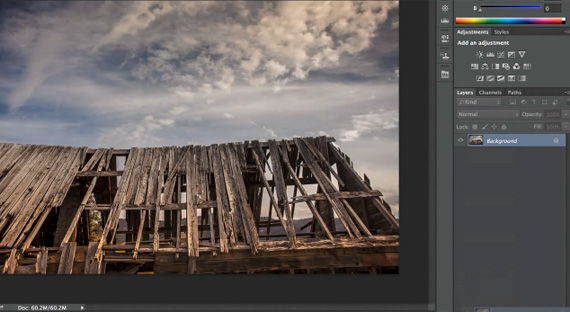
Original Image with Sagging Roof
2. Access the Puppet Warp tool from the Edit menu.

Selecting Puppet Warp mode.
3. Drop pins into the corners of the image to ground it.

Pins dropped into the corners stabilize the selection.
4. Drop pins along the area you want to alter; use Shift+click to select multiple pins.

Selecting multiple pins allows for greater control of manipulation.
5. Manipulate the pins you selected by using the arrow keys on your keyboard or the mouse.

Final result.
Using Puppet Warp for Advanced Manipulation
For a more advanced example, Hughes chooses a photograph of a Maasai warrior. To alter the warrior’s figure and pose, he again uses the puppet warp tool, using the following steps:
1. Select the part of the image you wish to alter. Important: Save your selection.

Original image of Maasai warrior.
2. Create a new layer and paste your selection into it.

An additional layer for the selection we wish to change.
3. Select the Puppet Warp tool.

Puppet Warp, again, is accessed via the Edit menu.
4. Drop pins into the image where you wish to manipulate it. Grab pins with the mouse cursor to stretch and rotate the selection.

Manipulate the pins by dragging them with your cursor.
5. Click the check box to exit Puppet Warp mode, and add your background layer back in.

Wait! What happened?
6. Hughes notes that at this point, the background layer and selection layer are overlapping. This is why saving the selection was important in the first step. Hide your selection layer and return to the background layer. Load your previously saved selection into this layer.

Load the original selection back into the image so that it can be deleted.
7. Now you’re going to want to modify your selection so that you can effectively use the Content Aware Fill tool in the next step. Expand the edges of the selection by a bit. Hughes recommends 18 pixels here.

Expanding the edges of the selection.
8. Next, delete the selection. This will prompt the Fill dialog box. Make sure that you have Content-Aware selected, and click “OK”.

Deleting the selection to prompt the Content Aware Fill dialog.
9. Hughes notes that the background fill doesn’t need to be perfect. The original image of the warrior has been removed, so you can now unhide the manipulated selection layer.

Final image.
Now that you know how to use Photoshop’s Puppet Warp tool, you can add drama or interest to your own photos by altering and manipulating them within Photoshop.
Like This Article?
Don't Miss The Next One!
Join over 100,000 photographers of all experience levels who receive our free photography tips and articles to stay current:


Leave a Reply