Taking photos of light trails may seem difficult, but it’s easier than expected and is based on a lot of trial and error. Light trail photos are most commonly found with car headlights and tail lights, but you can also make light trails with stars (star trails) or any other light source in motion during low light hours of sunset or night.
Light trails are basically long exposure shots that take place around moving sources of light. There isn’t much you will need to be able to take these shots, but a proper camera, and additional equipment can help, even though some is not needed. I will explain the basics.
Equipment
For a long exposure shot (the basis of this tutorial), you will need a camera that has some control over the exposure settings, such as changing the shutter speeds. Some cameras may allow you to slow the shutter speed down, while others (such as DSLRs) allow you to leave the shutter open for an infinite amount of time until you manually decide to close it, which allows as much light into the camera as you deem necessary.
You will also need a tripod for this, as having a camera handheld with long shutter speeds will make it near impossible to compose a good looking shot, without everything being blurry. I have done long exposures on rests before, such as a bridge overlook, and it worked well. You just have to make sure the camera has minimal movement during the exposure.
Two more things that can really help, but are not needed, are a remote shutter release, and also a lens hood, which can help block surrounding ambient light (such as if you’re in the city or near street lights). The remote helps so there is no camera shake when pressing the shutter button. Using mirror lock-up (a feature on most DSLRs) will also minimize camera shake. My last tip, which is good for any long exposure, is to use the noise reduction function if your camera has it.
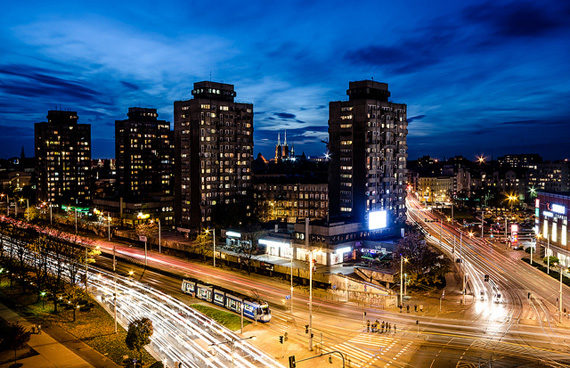
Photo by Maciek Lulko; ISO 100, f/11, 30-second exposure.
Setting Up Your Shot
For our examples, let’s assume we want to take long exposure light trails of car lights. You’ll want to find somewhere where there is a lot of fast-moving traffic, and not much ambient light. Although, I must add, having neon signs or other lighting on the side can make for cool effects.
Now, find a good perspective that will catch the car lights passing by. Set up your tripod and camera and get ready!
Camera Settings
This is where trial and error come into play. There are no exact “perfect” camera settings. It all depends on the ambient light around you, how fast traffic is moving, etc.
- First of all, set your camera to a low ISO setting. This will reduce the amount of noise in the shot.
- Next, set your aperture (increase your f-stop number) and take test shots and see how they turn out. This is where the trial and error comes in. I usually set my shutter speed to around 10 seconds or more. But then again, I always use bulb mode.
- If your shot comes out too dark, increase your aperture size (lower your f-stop number). And if your shot is too overexposed, decrease your aperture size (raise your f-stop). Aperture affects your depth of field also. Keep in mind, you don’t have to stick to ISO 100 or 200. Try all different mix match settings and see what works best for you. What I do is use bulb mode, which leaves the shutter open for as long as you want it to be open, in which you hit the shutter button for the second time to close the shutter. On a DSLR, this is usually on the mode dial, marked “B”. I usually set my ISO to 100 or 200, use a remote, hit the shutter button, and wait about ten seconds, then close the shutter. I then look at my shot and figure out if it’s too dark, too bright, etc.
Getting Your Shot Timing Correct
The last part is getting your timing correct. You’ll want to look through your camera and know where the photo will actually begin. This is because you want to start your shot before any cars enter the shot. If you don’t, then you will have some light streaks start midway through the shot, coming out of nowhere. Sometimes this can’t be avoided though, and also sometimes it can turn out to be cool. But most times you want to expose the shot before any car enters the shot.
Last Tips
I only have a few more tips, and you’re ready to shoot!
First, always shoot in RAW mode (as you always should anyway) so most adjustments will be easily corrected later on.
Next, you may need to use manual focus, as it can sometimes be hard to focus in the pitch black dark.
Last, keep in mind what the difference in f-stops do. For instance, you take a shot at f/5.6 at a street light, and it comes out normal. If you take the same shot with an f-stop of f/16, you will have a star effect on the light. Just something to keep in mind if you have any signs or other lighting subjects in your shot.
I hope this tutorial has helped you out, answered all your questions, and that you come up with some great light trail shots!
About the Author:
This article was written by Ty Sharp from tysharpphotography at wordpress. More details can be found on his blog.
Like This Article?
Don't Miss The Next One!
Join over 100,000 photographers of all experience levels who receive our free photography tips and articles to stay current:




TY, I enjoyed your article but your website appears to be down and your blog is a private blog to ahich a visitor needs a password!
If you guys like my tutorial, check out my website!
http://www.tysharpphotography.com/
And my blog!
http://tysharpphotography.wordpress.com/
Hi
Here is an article I wrote about this topic – check it out!
http://improvephotography.com/544/how-to-shoot-light-trails/
Regards, Erik
Kerstenbeck Photographic Art
I believe that your directions for adjusting the aperture are a bit twisted around. If your image is too dark, you would want to increase the aperture size, but that would actually be done by choosing a lower number on your f-stop. The relationship between the number and the size of the aperture is inverted. Based on your explanation, I think you know that but just got tripped up on the wording.
Hi
Great article and tips – I tried to follow some of this guidance and came up with these shots of San Diego
Uptown from Downtown: http://t.co/WpR66fB
Gas Lamp Quarter: http://t.co/8qMRfcy
regards, Erik
Kerstenbeck Photographic Art
NIce tips… something i’ve always meant to try, and yet to get round to it….