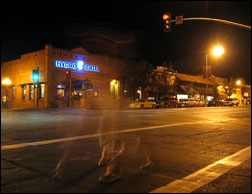
 As the light fades, do thoughts of photography wane also? If that’s the way you think then read on as we will be showing you that low light photography is awash with opportunities!
Images, whether from film or digital cameras, need one ingredient… light. How then can photographers get good images in low light conditions? Using flash would be one way. But even the most dimly lit scene has some light – and that means the potential for a great photo!
What equipment will I need?
Well, you will need a camera as well as charged batteries, that’s for sure. Also, a tripod is invaluable for exposures lasting greater than 1/30th second (1/60th in some cases). A torch, a decent lens and think about a remote shutter release – using long shutter speeds means the potential for camera shake and blurred images is even greater than usual (the alternative is to use a self timing mechanism to trip the shutter).
What about white balance?
Night time often means scenes lit with artificial light. This will inevitably give a colour cast to your shots although this can be pleasing sometimes. There are many types of lighting (tungsten, halogen, fluorescent) and they will all come out with different colour casts – live with it! Try different white balance settings to see what effect it has on the final image.
 How do I calculate the exposure?
This can be difficult. But with modern digital cameras you can see the results immediately and therefore make any adjustments straight away. Your meter may lie! Be ready to change the settings (and give a longer exposure). Night time shots can be very contrasty (bright lights and deep shadows) – the camera won’t be able to cope with the extremities of exposure so just change the settings yourself until you are happy with the results! You may need to use the “B” or “Bulb” setting to hold your shutter open for long periods.
What can I photograph at night?
Virtually anything! The choices are almost limitless. We suggest you consider:
Buildings
Lights
Signs
Bridges
Cars / vehicles
Lit houses / pubs / shops
People (motion blur can be a useful effect)
Street illuminations
Fireworks
Bonfires
Fairgrounds
Reflections in lakes, pools

To calculate exposures you can use a rule of thumb – see below for rough examples of exposure times. However, each circumstance will require a different approach so you can expect to adjust things frequently!
Night (assume f16 ISO 100)
Town / City 20 sec
Signs / Lights 2 secs
Streets 20 secs
Streets 20 secs
Churches 30 sec
Fairgrounds 10 – 15 secs
Candlelight 60 secs
Fireworks 1 – 60 secs
One interesting aspect of night photography is the recording of moving trails of light. Cars, buses, trains, bikes will have bright headlights and tail lights which will record as trails across your image if you shoot them whilst they are moving with a slow shutter speed of anything from 2 – 20 seconds. Try it! The same goes for fairground rides. And don’t forget that you can create your own trails with statically lit objects by zooming in or our during a long exposure or even panning the tripod head.
 Bracketing
By taking a shot of a scene with, say, as stop of under exposure and a stop of over exposure, you will be more likely to capture an image that is correctly exposed. Bright lights tells the camera to underexpose. Many cameras will have automatic exposure bracketing to allow this to be done with minimal fuss! You are trying to record some detail in the shadows without burning out the highlights. If you take an image of a scene at 4 second exposure, take the same scene with 8 seconds and 2 seconds. In this way you will be likely to get the exposure you are looking for.
Night photography “feels” different. Different sights, different sounds, different locations and different camera settings. Nobody is an expert – we all have to experiment. With modern digital cameras this is something that can easily be achieved.
Have fun!
Eric Hartwell is an enthusiastic photographer and owner of the photography resource site http://www.theshutter.co.uk and discussion forums at http://www.theshutter.co.uk/forums.
For More Training on Low Light, PictureCorrect Suggests:
Check out this best-selling eBook on how to do amazing low light photography techniques and photoshop effects. It can be found here: Trick Photography and Special Effects
Like This Article?
Don't Miss The Next One!
Join over 100,000 photographers of all experience levels who receive our free photography tips and articles to stay current:
 Bracketing


I agree with Bridgett the picture looks like ghost people’s feet dancing in the street. I like it.
Well done for yet another extraordinary article.
A good article by Frank Düpman about Low light and wrong gear is here:
http://manfrottoschoolofxcellence.com/2011/11/10/frank-dupmann-low-light-wrong-gear-never-give-up/
Great intro to the topic and plenty of inspiration for those new to low light photography. You mention white balance and I think that’s one of the most fun parts of this kind of photography. It’s often difficult to see true colours by eye in very low light and you can reveal some great scenes and surprises by being creative with colour balance.
I have a question I need some help with.
I recently started working in a night club as a photographer for them.
with the disco lights and light shows.
I have a Canon power shot sx30 15 35x zoom
I am using candle light low light setting. Manual focus . Smart Shutter and any kind of workable setting i can find.
On the dance floor the flash is whiping everything out but photos come out ok
Up close people faces are fine. What I am trying to do and can only get one or the other on the dance floor is people dancing x cancels out the light show and or light show cancels out the people What do I need to do to get both. My other camera settings have the indoor night time, party,fire works setting and still having problmes getting the camera to produce the right image for us. Can anybody help me with this.?
Bridgette-
It’s a manhole cover with steam coming from it….
I love the introduction the info and pictures, were helpful on my end now I know what to write & do on my class project. Thank you. one question tho? Why does it look like in the first pictures at the top, looks like people walking in the road? it is very faint like ghost like figures walking the street.
Great piece! It was very useful for a starting out photographer. Especially the little rule of thumb chart! Thank you so much!