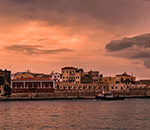
A style of photography that is growing rapidly in popularity is HDR Photography. To be defined, HDR (High Dynamic Range) photography is photography that captures a wider and more natural range of colors and intensities. This allows for photos to appear as the human eye actually sees them rather than only allowing a part of a photograph’s coloring to appear true. For example, for the photo shown below, if taken without using HDR you could either have the building be well exposed and have the sky far too bright, or the sky well exposed and building be silhouetted. With HDR you would be able to have both well exposed as you natural see it.
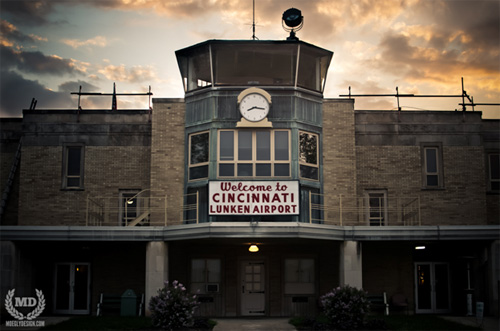
Completed HDR Photo After Selective Blending
A popular way of creating an HDR photo is to merge multiple photos of differing exposures together, so this tutorial will cover that method in showing how the photo above was created.
Step 1. Bracketing your shot
Bracketing is a helpful tool to use for almost any type of photography, but is essential in HDR photography. Bracketing is taking several photos of varying exposures of the same subject in order to create a proper exposure for each element in the shot. Bracketing is great to use in almost any conditions and style of photography, just so you have as many options to choose from when you’re editing. Some cameras have a built in bracketing feature, but if not, it is easy to manually bracket as well. For this image, there are really only 2 main elements, the sky and the building. First, one photo was taken to get a proper exposure of the sky:
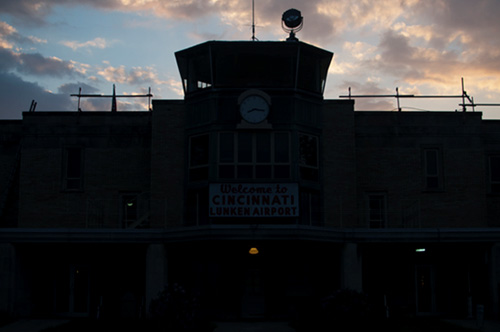
Slight Under-Exposed Image
This was taken with a faster shutter speed in order for the skies natural colors to show. The sky looks great in this photo, but as said earlier, the building is completely silhouetted. Keeping the camera in the exact same position (tripods are highly recommended) a second photo was taken to get a proper exposure of the building:
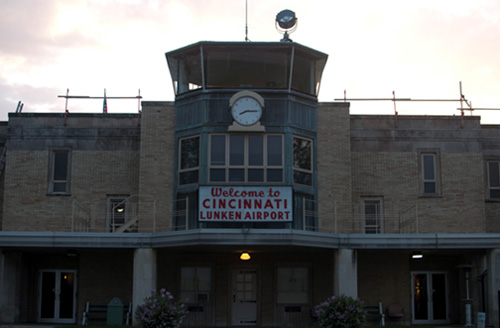
Slightly Over-Exposed Image
This photo was taken with a slower shutter speed in order for the building to be well lit. Now the building looks much better and our sky is blown out. The next step will be merging these two photos together to get the best of both.
Step 2. Merging the Photos
The merging of your photos can be done in a program like Photoshop, which is what we will use in this tutorial. First off, both photos are brought into Photoshop.

Merging Bracketed Images in Photoshop
Then the photo with the exposure for the building is moved over on top of the photo with the exposure for the sky.

Arranging Layers in Photoshop
Here is where the merging of the photos actually takes place. In the top photo, the sky is what is blown out and over exposed, so the sky will be removed from this photo. Once the overblow sky is removed, the properly exposed sky in the layer below will be revealed. To do this, the top layer is selected, then the magnetic lasso tool is chosen and the entire sky is selected.

Selecting and Isolating the Sky
Then this selection is deleted by simply pressing the delete key.
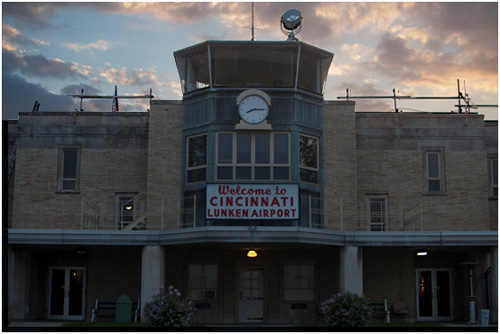
Deleting the Sky from the Top Layer
Then with some additional editing in Lightroom, the photo was complete.

Completed HDR Photo After Selective Blending
HDR photography is a great way to achieve a natural looking photo of a setting that may not allow for it with standard methods. Some HDR photographs are created by merging a dozen differently exposed photos, although these photos tend to look a bit unreal. To achieve a natural look using HDR, use moderation in how many photos you blend together and leave room for natural shadows.
About the Author:
Nicholas Moeggenberg is a web designer and photographer from Cincinnati, OH.
Like This Article?
Don't Miss The Next One!
Join over 100,000 photographers of all experience levels who receive our free photography tips and articles to stay current:



Great article and I like how you made it easy to understand.
I live this tutorial! It explains simple enough the HDR. Thank you!
Mechanics. Photoshop and HDR etc is the modern day equivalent of the wet dark room sans toxic chemicals
Would you call Andsel Adams a mechanic? His great shots were made in his darkroom. To paraphrase Mr Adams, the shot is the score the print the performance. Get with the program Bruce.
Like it or not post processing is part of the digital photo world. By the way, post processing was part of the game when film was king too. Dodge and burn, cropping, cross processing etc.
HDR photography is for mechanics not photographers.
Great tutorial! I totally agree that this is most effective when it isn’t overdone. In this example, sometimes I might erase the sky where at meets the building at about 10% opac. to make it more natural. The photo is v. cool btw!