Okay, so you’ve decided that you want to be a wedding photographer. You might have come to this conclusion after years of practicing photography and finally settling on a niche. Or, perhaps you might have just done a friend a favor and photographed their wedding and thought that it was an enjoyable, easy way to make some money. Whatever way you’ve arrived at your decision, I will try to run through things that you can do to make your career a success.

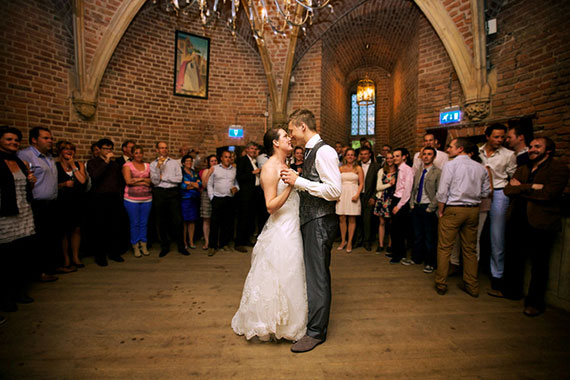
photo by Sebastiaan ter Burg
There are many different levels of wedding photography and all have a valid place. Just remember to sell yourself in the right bracket so people will have an appropriate expectation of your work.
Get a portfolio together of your wedding photography. It must be wedding photography; your pretty landscapes and holiday pictures of the kids aren’t going to cut it. If you don’t have any wedding pictures to show, hire a model and take some yourself.
While participating in photography courses can improve your work, don’t use the photos from that day to promote your photography. Someone will have been posing the model and showing you what to do–you will inadvertently copy other students’ techniques; the work is not really your own and if you can’t reproduce it on the big day people are going to be disappointed. As you progress and improve, you can start to charge more and move up the wedding photographer ladder.

photo by Ka Ho LEUNG
No matter what level of wedding photography you are doing, I would certainly advise you get wedding photographer insurance in case the worst does happen. It’s inexpensive and will give you extra confidence knowing that, if something goes wrong, it’s not going to end up causing you financial difficulty–especially in this day and age when we constantly read about people being sued.
Now that we’ve got those bits out of the way, let’s talk about the plan. “Plan?” you say. Yes, you need a plan! A plan of action for the wedding you’re about to photograph. Let’s say someone has seen your work and they want you to photograph their big day. Great! What happens now? Well, you will have a pre-wedding meeting with the couple to go through how they want things done. Yes, that’s right, how they want things done—not you! Listen to what they have to say, then you can make your recommendations. If you don’t think you can meet their needs, you should strongly reconsider doing the job as they will probably be disappointed in the end. One bad customer means you will need twenty good customers to cover up the resulting bad feedback.
At the meeting, advise the couple on your prices and the different packages you have available, as well as the prices of wedding albums and extras. Additionally, make sure you take a contract with you and get both of them to sign it. Ensure you leave them a copy, too. Get a deposit for the package they have chosen. Do a run-through of the day enabling you to get a picture in your head of all the stages so there are no surprises. Preparation will make your life easier so you can actually enjoy the day yourself; everything will just happen with a natural flow.
I personally always book a pre-wedding shoot at the venue with the couple, one to two weeks before the wedding day, at the same time of day as the actual wedding. This generally takes one to two hours, but it means that I know exactly what is going to happen and where the sun is going to be so I can work all my shots out and plan for every eventuality. It also lets the couple know where you are going to be and where you expect to take important shots of them. At this meeting I also request they write a list of who they want in the group shots and provide me and the best man with a copy. I make it the best man’s job to organize the people for the group shots so I am not responsible if we miss anyone. And it lets me concentrate on taking the pictures rather than trying to organize a lot of people I don’t know.

photo by John Hope
After the couple has left the pre-wedding shoot, I walk around the venue and find out where I can get all of the incidental shots that will help make the wedding album. While at the venue it’s a good idea to search out the manager and introduce yourself to them, explaining that you will be shooting the upcoming wedding. Remember, the couple is paying for the venue as well as for your services. You are both businesses; try to work together to make the day run smoothly. If you have never shot at that particular venue before, ask if they have any key positions from where to take groups shots, etc. Soak up all their knowledge.
Day Before the Wedding Checklist
- Check to make sure all your batteries are charged.
- Remove any unnecessary items from your bag; it will feel very heavy at the end of the day. You can always leave non-essential items safely locked in your vehicle in case you need them.
- Check that all the settings on your camera are correct and not set for some other type of photography, like landscapes.
- Format all your memory cards. I never shoot a big day with a brand new card; I always use it a couple of times first, just in case.
On the big day just have fun and enjoy your job!
Depending on what I’m covering, I generally take anywhere from 1000 to 2000 images and from these, I expect to get between 250 to 400 images of unique quality. Why so many? Well, at certain times of the day, I will take shots in continuous mode to capture people in between blinking or having their mouth open. Also because I love taking pictures and I want to catch every moment and every detail.

photo by Brent Miller
I only shoot in JPG not RAW. Everyone is different and lots of people have their own opinion on how to shoot a wedding. Personally, I shoot in JPG so I can shoot a large number of images without filling up a memory card every five minutes and also, when I download the images I am not using up all of the space on my computer with a single wedding. The other pain with RAW is that you will need to expose every image manually and I don’t have time to do that on a large scale basis. This might be something I do for landscape work where I need the extra detail and wish to manipulate the image. The one thing you do need to ensure with shooting in JPG is that you get the image right, in the camera, the first time, as you won’t be able to fix it later. If you don’t think you can do that, I suggest you use RAW until you get some more experience.

photo by Max-Leonhard von Schaper
While the couple is away on their honeymoon, I generally spend one day editing their photos and organizing them. Consequently, when they get back, I will have created two galleries: one for them to proof all of the images I think are worthy and the other for their guests to buy selected images (I don’t include every image—only the ones I think the couple would want made public. I also don’t make it public myself, I leave that up to the couple.)
Now that you’re all done and the couple has selected their wedding album and prints, it’s time to sit back, relax, and concentrate on your next wedding.
About the Author
This article was written by Terry Livesey (www.midlands-wedding-photographer.com), who is a professional photographer from the United Kingdom.
Like This Article?
Don't Miss The Next One!
Join over 100,000 photographers of all experience levels who receive our free photography tips and articles to stay current:


This is a concise and beneficial wedding ‘how to/to do article. Sans the technical jargon and ego-centric information sometimes put forth for consumption by some ‘authors.’ I too shoot jpeg, preferring to compose in-camera, realizing that some 12 percent (more or less) will be of use for the happy couple. I shoot, shoot, shoot away not wanting to miss that candid shot which may well turn out to be ‘the shot’ of the ceremony. Finally, I intend to use the best man as the ‘gatekeeper’ of all who should be formally photographed as well.
Great read! I have always shot RAW, it’s like a comfort blanket. If I don’t nail the shot I can tweek later…
FWIW I also have many photographer friends who also shoot JPG and others RAW…
I absolutely have to disagree with this statement: “The other pain with RAW is that you will need to expose every image manually and I don’t have time to do that on a large scale basis.”
I shoot raw and NEVER process all my photos manually. When you shoot raw you simply select all the photos and adjust only one. It makes the adjustments to all the rest. RAW allows you the control to fix major issues and save photos you wouldn’t otherwise be able to.
I respect your opinion though. Many love jpg.
I’ve been a wedding photographer for nearly 3 years now and while it seems that every day I hear about new photographers entering the industry–I just wanted to thank you for your gracious and welcoming attitude regarding newbies. You gave sound, positive advice and it’s not something I come across regularly. Plus.. we all can use a reminder of these tips. In fact, your tip about clearing out your equipment bag is the one thing that I personally always forget to do on wedding day! My bag does feel heavy and I know I would be easier on myself if I could just master that! So, after reading this post I added it as part of my wedding photography check list so I won’t forget again! Wahooo!
Thanks again and keep up the great work.. everyone has to start somewhere!
Good tips. On the RAW vs. JPEG front, I think it’s important to point out that memory is so inexpensive nowadays that there’s almost no reason to consider space. Even with my 5D Mark III’s huge RAW files, I can fit around 900 on a 32 GB card. Two card slots per camera and two bodies for a wedding (which is probably typical), I can get through an entire wedding without ever pulling cards. Peace of mind!