As a wildlife photographer, I have taken a few images of some of nature’s smallest creatures, like incredible hummingbirds, and her biggest, the Blue Whale—the largest animal living on our planet. Cetaceans, the term used to describe porpoises, dolphins and whales, are mammals, just like ourselves. They are warm-blooded, have mammary glands to feed their young, possess a four chambered heart, and have hair on their bodies. Like all mammals, whales breathe oxygen. They surface to exhale and take in a quick breath before submerging. During the past few centuries of relentless commercial whaling, this behavior was the Achilles’ Heel of the great whales, because whalers can spot the animal even from a distance and thus gave rise to the old, familiar cry, “Thar she blows!”

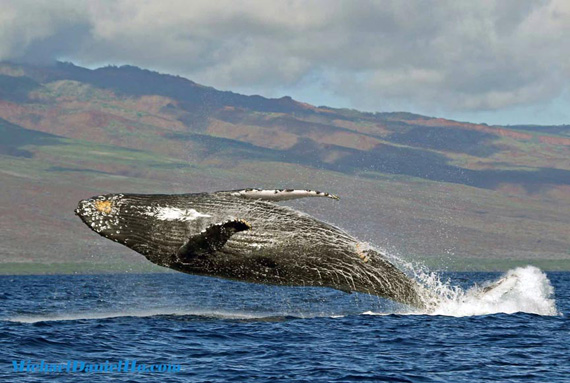
Photo captured by Michael Daniel Ho
There are two types of whales: toothed and baleen. Toothed whales, like Killer whales and Beluga whales, have one blow hole on top of their heads and use their teeth to seize their food. Baleen is a strong and flexible material made out of keratin, a protein that is made from the same material as our hair and fingernails. Baleen whales, like the Humpback, Gray and Blue whales, have two blow holes and feed by swallowing huge amounts of water, filled with small fish, krill, and plankton. They then close their mouths and the baleen on the side traps and filters the food and releases the water.
Fortunately, apart from some small scale whaling operations in various parts of the world today, most shots coming from humans these days are from DSLR cameras. There are approximately 78 distinct species of whales. Some are rather uncommon and difficult to locate, while others are whale watchers and photographers’ favorite, like the Humpback whale and Orca because of their acrobatic displays and beautiful songs. Spotting whales is not a sure thing even when going out with a seasoned whale watching company.
Knowing the time and place will greatly improve one’s odds. Sperm and Humpback whales are most active during the winter months in Dominica and Hawaii, respectively. Humpbacks are also found during the spring and summer months around the waters of New England, Nova Scotia, Newfoundland, and Alaska. Spring is also a great time to witness the Gray Whale migration off the west coast of North America. Killer whales can be seen during mid Spring to late Autumn in the Pacific Northwest during the salmon runs. Beluga whales are plentiful during the summer months near Churchill, Manitoba. Sperm and Southern right whales are often seen in the waters off Argentina and New Zealand during the winter months. There are of course many other spots around the globe where Cetaceans can be observed and photographed.

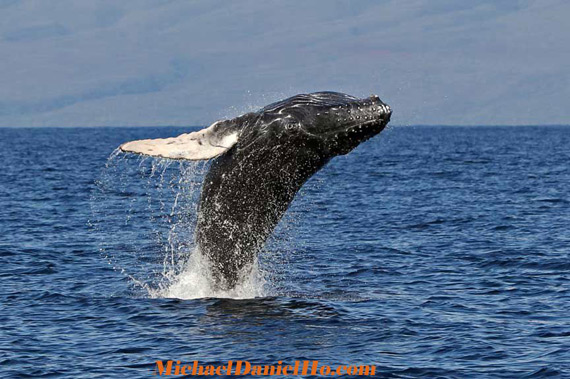
Photo captured by Michael Daniel Ho
Generally, most whale watching companies utilize boats ranging in size from small to large, carrying anywhere from 20 to 100 people or more. Whenever possible, I always go on a zodiac because it is faster and less crowded. On my photo shoots, I usually bring two camera bodies and two lenses. My camera equipment is from Canon, and the bodies are the 1D MK4 and 7D, and the lenses are the 100–400mm f/4.5–5.6L IS and 70-200mm f/2.8L IS II zooms. I use zoom lenses because a zodiac can approach whales and vice versa in a short time and a prime lens will be of little use. Quite a number of times, Humpbacks, Gray and Killer whales came right up to my zodiac and I wished I had a wide angled lens on my camera. The generally accepted global standard distance for viewing whales is 100 yards but sometimes it is hard to enforce and other times, over enforced.
In a small zodiac, bouncing in the ocean, tripod/monopod and even image stabilizers are of little use. I photograph in Aperture (AV) priority mode and set my camera to 1 stop above the maximum and an ISO speed of at least 400 to obtain shutter speeds fast enough to freeze the action, especially on breaching whales. The Drive Mode is set to maximum continuous burst—the faster the better. If the light is poor or fading, I will go all the way up to ISO 1600 or open the lens up to its maximum aperture, in that order, if necessary. My AF points are set to the center with surrounding assist points turned on and focusing priority takes precedent over shutter release or frame rates. No point in getting blurry shots unless the subject is clearly in focus. Depending on where the majority of light is coming from, in relation to the whales, I would also adjust my exposure compensation to account for the difference. With the combination of bodies and lenses I bring, it affords me a good range of focal lengths, ranging from approximately 90mm to 640mm. Whales are fairly large animals, even though most of the time only a small portion of their bodies protrude above the water, but I almost never use an extender. If the whale is too far, I wait for a closer encounter next time. Photographing a breaching whale is one of the most exhilarating experiences for me. It takes a lot of practice, patience, and lightning fast reflexes because it can occur anytime, so one must have the proper camera settings ready.

Photo captured by Michael Daniel Ho
California is one of the prime locations for whale watching and photography in the world. Gray, Blue, Humpback, and Killer whales and others are found at various times of the year, along the west coast of North America, from Alaska in the north, down to Costa Rica in the south. These areas can be reached by car or a few hours by air. However, my favorite spot for whale watching and photography is Maui, Hawaii.
About the Author:
Micheal Daniel Ho is a Travel and Wildlife photographer living in California (http://michaeldanielho.com/). For over 20 years, Mike’s passion for the environment and conservation has centered on his love of travel and wildlife photography.
Like This Article?
Don't Miss The Next One!
Join over 100,000 photographers of all experience levels who receive our free photography tips and articles to stay current:


I had the opportunity to shoot a pod of Orcas in Alaska for about 45 minutes.
Much harder than land based animals.
I generally try to widen my zoom as much as is useful and try
a quick zoom-in to get tight on the subject.
A good guide who knows local whale behavior is a must.
Most of all, however, is pure dumb luck.
I’ve gone out a number of times from Friday Harbor to photograph the orcas. I’ve been tempted to try the zodiacs, but am curious how you handle the saltwater spray? It seems like there would be a fare bit of it.
Hi and thanks for your interest in the photographing whale article. Actually, I find photographing breaching whales far or near equally challenging for different reasons. If the whale is breaching far away, a tiny movement from a bouncing boat or camera shake will be magnified many times over. If the whale is breaching close, chances are the image will fill the viewfinder and one has less time to react. If I have a ‘choice’, a breaching whale at about 150 feet will be ideal. Of course, the hardest thing is trying to find a breaching whale with a good angle to begin with. It takes time, patience and experience to get a good shot.
Hi Michael,
Thanks for sharing those pretty in-depth tips for taking photos of whales. I really like how crisp these photos are – despite the fact that you were taking them on boats out in the ocean! You mentioned that breaching whales are very hard to take steady shots of – do you find that those shots are even harder the closer the boat is to the whale?