
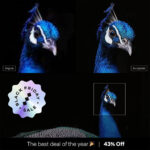
Before Retouching

After Retouching
This tutorial is to help you learn how to retouch black and white photos like the pros. More specifically, how to create harsher darks and lights. The two tools we will be using to create these effects are the Dodge Tool and the Burn Tool. Ok, once you have your photo open in photoshop:
1. Convert the photo to black and white using a new Channel Mixer Adjustment Layer. If you need more help with this step please refer to our tutorial on “Converting Photos to Black and White.”

2a. In order to darken certain areas of the photo, click on the Burn Tool.

2b. When using the Burn Tool use the Shadows Range, and an exposure somewhere between 5 and 20%. For this photo I used 12%.

Then simply drag a reasonably sized brush over the areas that you want to darken, you can continue to change the exposure to create a more realistic appearance.
3a. In order to brighten certain areas of the photo, click on the Dodge Tool.

3b. When using the Dodge Tool use the Highlights Range, and an exposure somewhere between 5 and 20%. For this photo I used 12%.

Then simply drag a brush (you pick the size) over the areas that you want to brighten, you should probably keep changing the exposure to create a more realistic appearance.
Like This Article?
Don't Miss The Next One!
Join over 100,000 photographers of all experience levels who receive our free photography tips and articles to stay current:


Leave a Reply