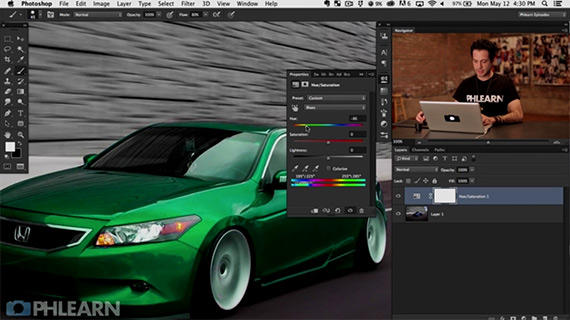
Knowing how to use Photoshop to manipulate image colors is an extremely useful skill. It can make all the difference when editing and enhancing photos. But with the vast array of buttons and options available in Photoshop it’s easy to feel lost. Aaron Nace from Phlearn shows us how to easily change the color of anything in Photoshop, while adding some quick stylizing features:
How To Change Colors in a Photo Using Photoshop

Change Colors in Photoshop
- To begin, click New Fill or Adjustment Layer in your Layers panel, and choose Hue/Saturation. It can also be accessed from the tool bar: Layers > New Adjustment Layer > Hue/Saturation
- As changing hue will probably affect the overall color of the image, we can pinpoint the mask to a specific colour range to isolate the area needing changed. In the Hue/Saturation properties panel, click Master to reveal the dropdown menu of color ranges. Selecting blue will isolate all blues in your image, similarly, selecting yellow will isolate yellows.
- Click the eyedropper icon, and select (on your image) where you want to change the color. It will automatically set the master control to the appropriate color range.
- The masking layer may still leave a color cast on areas where you don’t want it. Use a black paintbrush and simply paint over the areas you need to mask. Similarly, using a white paintbrush will bring it back.
How to Change Highlight Colors

Change Highlight Colors
- Create a new layer, or click Layer > New > Layer.
- In the tool bar click on Select > Color range.
- In the Color Range box select Sample Colors from the drop down menu. Click in the color range within the highlights of the subject.
- Set Fuzziness to a level where it selects most of your subject’s highlights. Make sure the background or other elements are not shown in grey.
- Once your subject’s highlights are selected, open a Color Balance Layer > New Adjustment Layer > Color Balance.
- The Color Balance Adjustment layer targets highlights, mid-tones and shadows separately. Click Highlights, and pull the color bars around to get the color desired.
- Work on the shadows in your image. Change up the levels of the shadows and highlights to make for more visually dynamic subjects.
- If the effects are too bright or too strong, simply lower the opacity on the layer.
How To Add Stylizing Features

Darken Edges
Darken Edges
- Create a new layer, then click on Layer > New Adjustments Layer > Curves.
- Drag the S-curve down in the middle and reduce the highlights to darken the image.
- Hit Command (ctrl) + I to invert the layer mask.
- Use the Gradient tool icon or click Command (ctrl) + G.
- Use a linear gradient and set it from white to transparent. Click from the edge of the photo inwards around the corners. It will darken the edges and can create a vignette feel.

Add Lens Flare
Add Lens Flare
- Create a new layer.
- Use stamp visible to create a layer with everything currently seen on the image. Press Shift+Option+Command +E (Shift + Alt + Ctrl + E)
- In the task bar click Filter > Render > Lens flare
- Choose a lens flare, pull up the brightness, and set it at the light source in the image.
- Press Shift + Delete to fill the layer with black.
- Command (Ctrl) + F will recreate the last filter used—the lens flare.
- In the Layers Panel, change the blending mode from Normal to Screen. The image will appear the same but the lens flair is no longer attached to the source image layer.
- Manipulate the lens flare. Try to lower the opacity and add a blur (Filter > Blur > Gaussian Blur)
- Add a layer mask and paint with black paint to tone the flare down a bit.
- Add a new Color Balance Adjustment Layer to the entire image.
- Pull around the color bars to add warmth or coolness. Try adding more yellow and red to highlights, or add more blues and greens to shadows.

Before Changing Colors in Photoshop

After Changing Colors and Stylizing
The base and highlight colors of Charles Byron’s Honda Civic photograph are manipulated quite easily by using the Hue/Saturation and Color Balance layers. The same techniques can be applied to change colors in your own photographs. Use these techniques to change up a background wall, subtly adjust skin tones, or finally find out how you would look as a blonde.
Like This Article?
Don't Miss The Next One!
Join over 100,000 photographers of all experience levels who receive our free photography tips and articles to stay current:


Leave a Reply