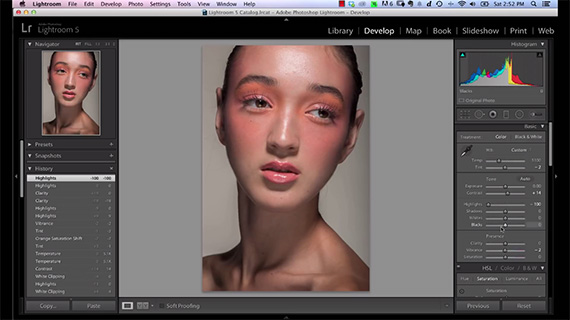
In this video tutorial, photographer Michael Woloszynowicz discusses an important aspect of portrait photography retouching: the art of recovering skin texture and details from overexposed areas. The best way to do this still is to avoid overexposing your images in the first place, but there will always be times when that doesn’t work out:
Highlights Slider
Most photographers prefer to start the process of recovering details from blown out areas by dragging the Highlights slider all the way to the left. The problem with this approach is that the entire image becomes kind of flat (as you can see below). These highlights actually help to create dimension in the face. A better option is to recover the texture from the affected areas while retaining the tonal information.

Dragging the Highlights Slider is a popular retouching choice
Frequency Separation
Frequency separation is that better option. The process takes a bit of understanding. Those who are already familiar with some of the steps will find the going easy.
1. Open the image as Smart Object in Photoshop. This allows the image to be opened in Adobe Camera RAW and to be manipulated separately.
2. In Photoshop, right-click on the image in the Info panel and select ‘New Smart Object via Copy’. This creates a separate smart object reference and not just a duplicate of the original smart object.

New Smart Object via Copy
3. Now double-click on the image and it should open up in Adobe Camera RAW.
Drag the Highlights slider in Adobe RAW all the way to the left. Also adjust the exposure slider a little bit. Click OK when you’re done. This is an example of what you can expect after the changes are done:

Post adjustment of Highlights and Exposure in Camera Raw
On top of this Woloszynowicz applies frequency separation.
Start by rasterizing the layer.
Next, duplicate the layer. Name one layer ‘High’ and the other ‘Low’.
Apply a blur filter on the layer marked ‘Low’. Woloszynowicz selects Gaussian Blur. How much blur should you use? Well, this is subjective. Woloszynowicz’s principle is to blur the finer pores and skin imperfections while leaving out the larger ones. This is what the comparison looks like before and after Gaussian Blur is applied:

After Applying Gaussian Blur
The next step is to Apply Image. Follow the standard routine and merge the two High and Low layers together. Name it ‘Recovery’.

Merge the High and Low layers together using apply image.
The next step is to clip the image. Hold down the Option / Alt key and hover between the high resolution and the Recovery layers. Don’t forget to change the blend mode to ‘Normal’. Again, everything is subjective and individual cases will vary. Here Linear Light brings out crazy details. At the end of the day you want to keep a balance between highlights and texture that you recovered from the over-exposed areas.
If the sharpness is still way too high, you can make a quick selection of the areas that you want to blur a bit, create a mask, and paint black over it to tone it down.

Gaussian Blur the Quick Selection before painting black for texture smoothing.
Adding a bit of skin tone to the areas that you recover is also a good idea at this point.
Here’s a quick before and after look:

Before (left) and after (right) recovering skin texture
Recovering blown out ares of skin is an essential first step for a full-fledged retouching routine for high-resolution portrait photography.
Like This Article?
Don't Miss The Next One!
Join over 100,000 photographers of all experience levels who receive our free photography tips and articles to stay current:


Leave a Reply