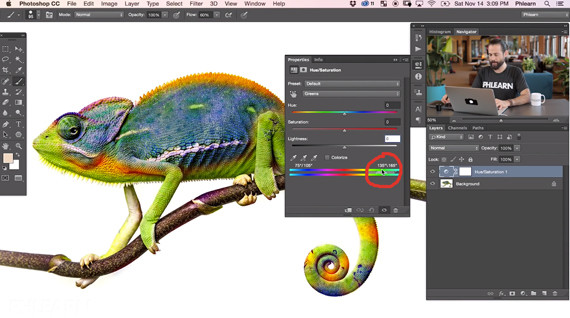
Photoshop is a massive program and even the simplest adjustments can have a number of mind-boggling options. Figuring things out by trial and error can take a lot of time, so if you’re new to Photoshop it can’t hurt to get a little help. In the video below, photographer Aaron Nace dives into the basics of the hue and saturation tool palette, a critical adjustment to learn for any kind of color correction or digital art:
Hue (which color) and saturation (how much color) are perhaps some of the more straightforward Photoshop adjustments available, yet even here we can find some unique functionality. How the first three sliders work is fairly obvious, but the function of the color spectrum sliders below those may not be so self-evident. They show what color is getting converted into what other color. They also provide a set of brackets (circled below) that allow you to narrow down the range of color you’re working with. By adjusting the brackets around the target color, you can zero in quite specifically on the color range you’re looking to change. This can help in everything from matching colors between images to adapting an image to a specific color palette.
Another key part of using the hue and saturation panel is knowing what to do after you’ve adjusted them—how you blend your changes into the image. This truly is where the Photoshop magic begins. For example, you can use the “color” or “hue” blending mode to paint color onto an image and then make it look uncannily like it was already part of the image. You can use other blending modes for other effects. Learning which one works best for the effect you’re looking for will take practice of course, but it’s well worth it the time and energy.
Like This Article?
Don't Miss The Next One!
Join over 100,000 photographers of all experience levels who receive our free photography tips and articles to stay current:


Leave a Reply