“With any form of photography, the photo captures a point in time; it is a record of what was there at that specific moment. However, to make a photo interesting to the audience it must be more than just a record.
Cities contain many buildings, good and bad architecture, shapes, patterns, people, and culture. Urban landscape is therefore a wide subject that can encompass the elements of both the physical and cultural aspects of a city.” — Adrian Pym

Urban Landscapes
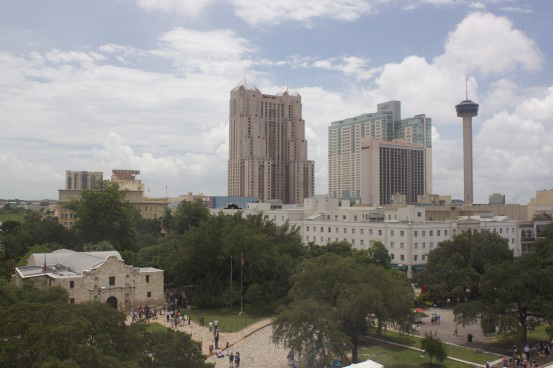
During a recent visit to San Antonio, Texas, my goal ahead of time was to obtain a rooftop, urban landscape shot of the city. At the heart of downtown, this image of the well-known Alamo and partial SA skyline achieved this goal and was the chosen one to use in this tutorial:

Original Image
One of my favorite aspects of photography is the post-processing that follows in the ‘digital darkroom’. With the series of city images I took that day, a standard workflow was developed following the suggested Topaz workflow chart. The adjustments applied in guidance transformed my daytime cityscape images in a non-drastic way, making them stand out compared to the lack-luster originals.

Topaz Workflow Chart
With the above workflow in mind, I brought the below images into several plug-ins in this order: DeNoise -> Adjust -> Clarity -> Lens Effects -> Detail
Using the Alamo City skyline as an example, here is a general idea of the post-processing steps I followed:
Step 1: DeNoise
- Open the image in Photoshop (or other host program).
- Duplicate the photo (Ctrl/Cmd + J) and open it in Topaz DeNoise 5.
- Be sure you are viewing the image at 100% so that it appears the way it should when brought back into PS. This magnification will also help you see the noise in the original image as compared to the after.
- Apply one of the settings you find most suiting to your image. I applied the RAW-moderate preset.
- Press OK.

DeNoise
Step 2: Adjust
- Bring the image into Topaz Adjust 5.
- Apply the Brilliant Warm preset for a sunny day.
- Reduce or increase the transparency as desired.
- Press OK.
Step 3: Clarity
- Open the image in Topaz Clarity.
- Apply one of the presets found in the Architecture Collection. For this image I applied the Cityscape I preset.
- Optional: Mask out the sky using the ‘Edge Aware’ brush so that the Cityscape I preset is only applied to the city:

Cityscape I Preset

Mask Out the Sky
- Press OK to bring the image back into PS to apply the changes.
- Bring the same image back into Clarity and apply the Clouds II preset found in the Landscape Collection.
- Use the Edge Aware brush to mask out the architecture and foliage so that the effect is only applied to the sky:

Clouds II Preset
Masking Tips
- Increase your brush size and strength around the bulk of the image.
- Zoom in to construct fine tweaking around the edges of the skyline with a smaller brush.
- Use the space bar to toggle between the before/after to help see what needs to be hidden or revealed.
Step 4: Lens Effects
- Bring the image into Lens Effects.
- Zoom in to 100% to see the exact changes that will be applied.
- On the left side of the interface scroll to xF Add Sharpening and apply one of the Sharpening presets and press OK. I used Sharpening II:

Add Sharpening
Step 5: Detail
- Open the image in Topaz Detail 3.
- For this photo I reduced the saturation by -0.10 for a more natural feeling.
- Apply the Overall Detail Light preset and mask out the sky/trees so that detail is only brought out in the architecture.
- Press OK.

Overall Detail Light Preset
Back in PS, I made Selective Color Adjustments in the cyans, blues, and yellows to take effect on the sky and foliage:

Selective Color Adjustments
The Final Result

Final Image
Like This Article?
Don't Miss The Next One!
Join over 100,000 photographers of all experience levels who receive our free photography tips and articles to stay current:


RegularGuy55 – In actuality, the image was shot in RAW, so the photo is nowhere near as vivid as what my eyes saw. I tried to manipulate the photo to my memory of that moment in time.
Hi Alexander,
I have not tried this process with just Photoshop, as I find the Topaz tools a lot easier to achieve the look I’m after.
If I could recommend one plugin, it would be Topaz Clarity, which gives you more control over contrast than you’d find in either Lightroom or Photoshop. With regular programs, you’ll only see one contrast slider, but with Clarity there are four different levels of contrast control. An additional benefit to using Clarity is that it comes with an HSL panel that includes edge-aware masking.
“There is a deep beauty in things as they are.” – Walker Evans
I’m sorry, but even with his ‘restraint’, I just don’t like the cartoonish effect. Instead of recording a moment in time, the manipulated images represent something that never was.
Hi Darcy, thank you for sharing your workflow. Do you think such result is not (or hardly) achievable just with a Photoshop tools? And what is the most important plugin if someone can afford only one?