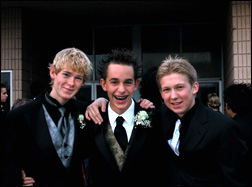
Before Retouching

After Changes
This section is to help you learn simple photo corrections and how to fix the minor imperfections and make a photograph look the best it possibly can. This photo is underexposed and has almost completely darkened half of the left subjects face. Also the yellow light in the upper right third of the picture draws too much attention away from the subjects.
First, open the picture in photoshop and in order to try to balance the exposure a little:
1. Open a new Levels adjustment layer
2. Then use the black eye dropper and click it on what you think is the blackest part of the picture, that will adjust the colors to match the black, it may make an unwanted change, if it does hit undo.
3. If the colors are way off the scale(like with the white in this picture) then drag the white or black (the white one as shown in this picture) markers in to balance the dark and light tones, you should experiment how far to drag them in depending on the picture, you might want to experiment with the grey marker that’s between the two also. When your satisfied click OK.
*Remember that if you don’t like what the levels adjustment layer (or any other adjustment layer) did to the picture, you can just drag it into the trash in the layers window.
After your done with the levels adjustment layer,
4. create a new Brightness/Contrast adjustment layer.
5. To brighten or darken (this picture needed brightening) the whole picture click and hold on the Brightness slider and drag it to the right or left (this picture only required me to drag it to the right +12%).
6. To adjust the Contrast of the whole picture click and hold on the Contrast slider and drag it to the right or left (this picture only required me to drag it to the right +5%). When your satisfied click OK.
*If you change your mind later you can always re-adjust the Brightness and Contrast by double-clicking on the Brightness/Contrast adjustment layer in the layers window.
Now you could be done, but to get a little picky it seems like there is a little too much magenta in their faces (digital cameras usually add too much magenta to photos for some reason). Here’s how to fix it:
7. Create a new Selective Color adjustment layer.
8. Make sure your only adjusting the reds in the picture.
9. Then click and hold the magenta slider and drag it a little to the left (more or less depending on how much magenta you want to take out). When your satisfied click OK.
That’s pretty much all you need to know to do basic touch-ups, but if you want to learn the more technical stuff that’s fine too. In the next part we will show you more advanced photoshop tips like how to brighten little spots where you want to take away shadows or just spots you want to emphasize. We will also show you how to take out certain items in the picture that you don’t want.
Now we’re going to try to take out some of the shadow that’s on the subject’s faces, mainly the subject in the middle and the one on the left.
10. Create a new layer (keyboard shortcut: Shift+Ctrl+N) and when it asks you what kind:
11. Change the Mode from Normal to Overlay.
12. Click the box which appears that says Fill with Overlay-neutral color (50% gray). Then click OK.
13. Then click on the brush tool (keyboard shortcut: (B))
14. Choose a softsided brush and set the diameter to about the size shown in respect to a face.
15. This is very important: Put the Opacity down to around 9%
16. The two squares shown here (circled in pink) should be black and white, if they are not click on the smaller squares (in the smaller circle of pink). When its on white and you paint on the new layer you created (steps 10-12) it will lighten the picture where you are painting. To switch and darken where you are painting click on the little arrows (also in the circle of pink, keyboard shortcut: (X)) to switch color so the black is on top.
17. Then we use the brush and click the spots that are dark on their faces. Then to accent the vests we just lightly click and drag the brush over the vest patterns. The subject on the right’s tie is a little too bright and overexposed so we switch brush color to darken by pressing X and drag it over his tie. We also darken the rose on the subject in the middle. And if you change your mind and don’t like the changes you can just delete the layer you created in steps 10-12. These are very subtle changes that don’t matter all that much on this picture but this technique can be invaluable in all sorts of pictures especially in accenting small details.
Now we will try to take out the pesky light that is above the subject on the right.
18. Click on the Clone Stamp Tool (keyboard shortcut (S). And select a brush size that’s a good size to work on the light.
This is very important, The Clone Stamp Tool won’t work unless you do this:
19. Make sure you have the Background layer selected. (The layers window is usually in the lower right hand corner of the program.)
The clone tool is sort of like a cut and paste tool, wherever you take a sample it will reproduce what’s in that area even if you move while you paint.
20. To take a sample hold Alt and click where you want the sample then release the Alt key. Take the sample somewhere dark that’s close to the light like shown here.
21. Then gently click and drag over some of the light.If you took the sample right, it should follow your movements and paint whatever is under the sample cursor.
22. Repeat steps 20 and 21 until you have painted over the entire light.
That’s all there is to it.
For Further Training on Retouching Photos:
Check out this in-depth eBook on how to do professional yet subtle photo adjustments that really bring out the best attributes of any photo. PictureCorrect readers can receive 15% off by entering the discount code picturecorrect. It can be found here: Understanding Post-Processing
Like This Article?
Don't Miss The Next One!
Join over 100,000 photographers of all experience levels who receive our free photography tips and articles to stay current:


Hii,
This is great and awesome post for me. i loved to read your blog. it’s really-really amazing. thanks for inspired me by your blog.Adarsh Park Heights in Gunjur
Hi, that is a great article there. It has helped us to start my blog and am doing good.
background removal service
Thanks!
thanks for sharing very useful and keep sharing
Nice post!
I have thought so many times of entering the blogging world as I love reading them. I think I finally have the courage to give it a try. Thank you so much for all of the ideas!
Very nice blogs!!! I have to teach a lot of information about these sites…Sharing for wonderful information. Thanks for sharing this valuable information with our vision. You have posted a trustworthy blog keep sharing,
product photo retouching services
Nice Blog, it contains tons of usefull information. Thank you, Richard!
That old interface.. how cute it is now, the way it looks hahah. That makes me recall my first steps with photoshop in the late 2000s.
This is one of the greatest articles, to be honest.
Sometimes, Basic Retouch make images so much clean and beautiful. Thanks
I’m sure they’ll be benefited from this website.
Thanks for sharing such beautiful information with us. I hope you will share some more info about…..Please Keep sharing!
wow, that was really great and resourceful content.
it really feels great. Thanks for sharing such a valuable information which is very hard to find normally. I have subscribed to your website and will be promoting it to my friends and other people as well.
thank you so much for this amazing posts
Thank you, Richard! This is great instruction, you have nice blog!
Good tutorial, thanks!
Seriously a lot of awesome information
nice info thanks for the help
I was confused about what touch up and retouching means now I’m relieved Thanks to this article. Confusion clear!
Amazing!
At last, I get a best tutorial about retouching. and it works for me.
Wow, this is great I certainly come back to see more of these tutorial. Thanks, :)
Many many thanks for sharing such a superclass tips with wonderful explanation. I will certainly dig it and personally suggest to my friends. I’m sure they’ll be benefited from this website.
The best retouching tut I have found yet! AWESOME!
Thanks for putting this online — it’s the best tutorial!