We talk about natural light photography and artificial lighting, lighting ratios, quality, and a million other things all related with the craft of lighting a scene. But rarely do we get to hear someone talk about and talk so extensively about dissecting the lighting used in a photo. Seeing photos and understanding how they have been made is one of the most useful learning tools to become a better photographer, as Tony Northrup, demonstrates:
Magazine covers are perfect for this exercise. Take this Vogue cover, for example.
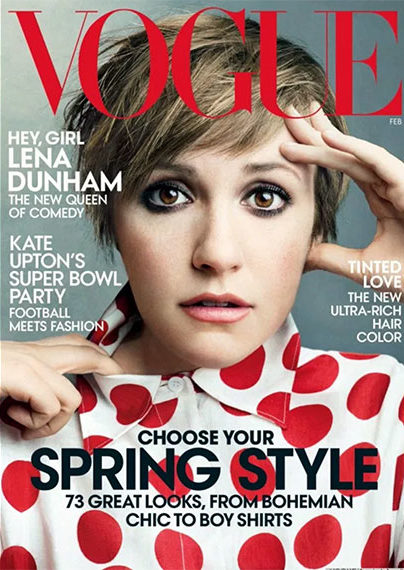
Look at magazine covers to practice dissecting lighting setups.
By examining this photo closely, you can make some assumptions about the lighting. It was probably shot with one large light source. Maybe a fill source—some sort of a reflector—was used to fill in the shadows. Could you tell which side the key light was on? If you said camera right, then you are correct. Notice the shadows on the model’s face. They are toward camera left—another indication that the light source was on camera right.
Did you also notice the light fall off? Light fall off is how the intensity of the light drops, which is directly related to the distance of the light source from the subject. Light fall off is more dramatic initially. So, it seems that the light source was pretty close, as the right shoulder of the dress looks really bright and the left side looks darker.
You can also tell the shape of the light. No, you don’t have to be a genius—just zoom in on the model’s eyes. Can you now tell the shape of the light? They say that the eyes are the window to the soul. In a photographer’s case, the eyes are a window to the photographer’s brain and an essential tool to decode the lighting setup that was used.
Was it a single light setup? Probably not. The shadows on the model’s face aren’t completely black, and that means there was some sort of a fill card or white board or something of that sort used.
If you’re really technical you might be wondering at this point whether any light was used to brighten the backdrop. The backdrop is pretty inconclusive. The upper left corner appears brighter than the lower right corner. There could have been a light used to create a gradient or it might just be that the backdrop was painted that way.
Northrup dissects several photos to find out the number of lights used, the position of the lights, and whether a reflector was used. The more you practice looking at photos and discovering how they were lit, the better photographer you will become.
Like This Article?
Don't Miss The Next One!
Join over 100,000 photographers of all experience levels who receive our free photography tips and articles to stay current:

I do most of the time. But whenever I do, after that I feel that I just waste my time successfully.
I found the segment about lighting in this article not only interesting but informative. Has given “room for thought” and now I will look at photographs more closely especially with regards to the use of various lighting techniques.