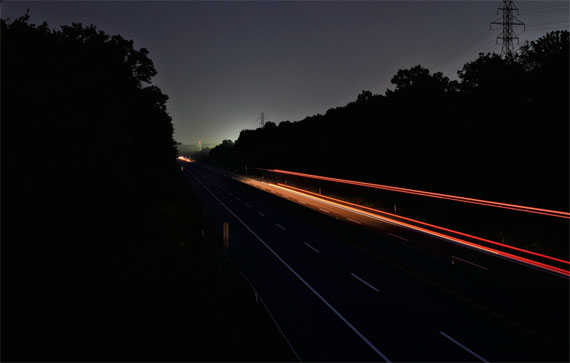
Light trail photography is a breathtakingly beautiful, yet simple concept. It involves capturing the motion of light across a frame using slow shutter speeds. In a recent video tutorial from JP Photography, he showcased the magic of light trail photography using nighttime traffic. This post will summarize the essential takeaways for those looking to recreate this stunning effect:
To capture stunning light trails, the following equipment is necessary:
- Camera: JP Photography uses the Nikon D5600 with an 18-140 lens, which offers flexibility in focal length, whether zoomed in or out.
- Tripod or flat surface: To eliminate the blurriness caused by camera movements, you need a steady base for your camera.
- Remote shutter release or timer mode: This feature prevents vibration when the shutter button is pressed manually. If you don’t have a remote, set your camera to timer mode to reduce camera shake.
Camera Settings
To get the best results, JP Photography recommends shooting in full manual mode, which gives you full control over your camera’s settings. Here are the primary parameters to keep in mind:
- Shutter Speed: Slow shutter speeds are necessary to capture light trails. Adjust the shutter speed according to the desired effect – the slower the speed, the more streaks of light you’ll see.
- Aperture: Depending on how long you want the shutter speed to be open for, you can adjust the aperture. In the video, the photographer ranged between f/3.5 (the lowest) and f/22.
- ISO: ISO controls the camera’s sensitivity to light. It is recommended to set it as low as possible to minimize noise; however, if the background is very dark, you may need to raise the ISO.
Focusing
Before you start shooting, you need to lock the focus. Wait for a vehicle to approach or use a bright object at a distance to help your camera focus.
Technique
Once you’ve set up your camera, it’s time to experiment. Timing is crucial; hitting the shutter button too early or late can drastically change the effect. Play around with the moment you press the shutter – just before a vehicle enters the frame, or part-way through the frame.
Note that your light meter may show underexposure due to the darkness, but if the shutter is open long enough with enough light hitting the sensor, your photo will have proper exposure. It’s all part of the trial and error of mastering light trail photography.
JP Photography also stresses the importance of your surroundings. Shooting from a bridge, for example, can offer a great vantage point, but be aware of any vibrations from passing vehicles that might disturb the shot.
Outcome
The photographer’s attempts yielded a range of results, from vivid streaks of light coming straight towards the camera to more subtle light trails that beautifully complemented the night sky. The most effective shots came from groups of cars traveling in both directions.
Final Thoughts
As with any photography technique, practicing light trail photography is the key to success. Start by understanding and managing your camera settings, then experiment with timing and composition. The process may be trial and error at first, but with patience, you’ll be able to capture captivating shots that truly capture the movement of light.
And remember, you don’t necessarily need a DSLR for this; you can create these effects on your smartphone as well if you have a pro or manual mode.
Like This Article?
Don't Miss The Next One!
Join over 100,000 photographers of all experience levels who receive our free photography tips and articles to stay current:


Leave a Reply