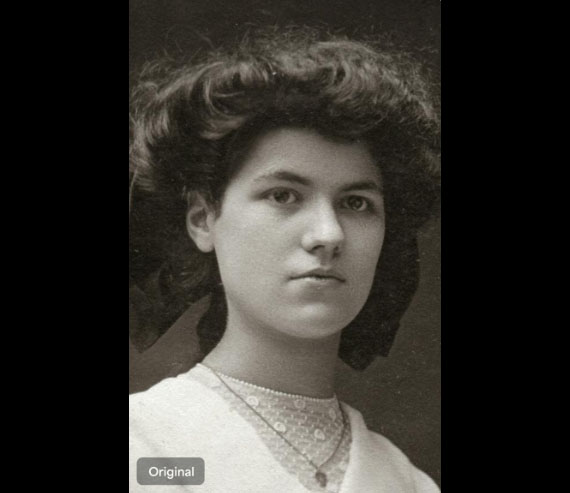
Got a collection of old family photos or vintage images that have faded over time? Whether you’re working with scanned prints or low-resolution snapshots, Topaz Gigapixel AI’s new Recover v2 model offers an easy and powerful way to breathe new life into your cherished memories.
The new model is 5x faster than the previous generation and delivers sharper, more faithful results—making it perfect for restoring legacy photographs with care. Gigapixel is currently 15% off here as the company celebrates the most recent update.
Here’s how to do it step-by-step:
🔧 Step 1: Launch Gigapixel AI
Start by opening Topaz Gigapixel AI on your computer. If you haven’t updated recently, make sure you’re running the latest version to access Recover v2.
📁 Step 2: Import an Old or Vintage Photograph
Drag and drop your scanned photo (JPEG, TIFF, or PNG) into the workspace. Gigapixel AI supports a variety of formats and is optimized to work with older, lower-resolution images—whether it’s a faded photo album scan or a historical black-and-white portrait.
Pro Tip: For best results, start with the highest-resolution scan you can get, even if it looks blurry or grainy.
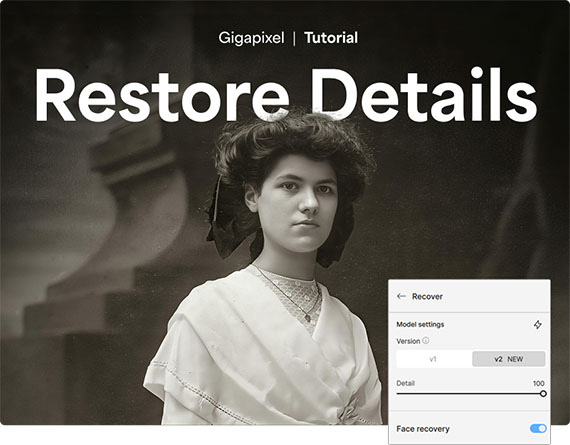
🛠️ Step 3: Choose “Recover v2” for Realistic Upscaling
Once the photo loads, choose the Recover v2 model from the AI Model dropdown. This is Topaz’s most advanced recovery engine yet—designed specifically for bringing back texture, clarity, and fine detail in old or damaged photos.
Select the “Standard” or “High Fidelity” setting under the model options to prioritize realism over aggressive enhancement. This ensures the final image stays true to the original character of the photo.
🧑🎨 Step 4: Use Face Recovery (Optional, But Powerful)
If your photo includes people, toggle Face Recovery on. This specialized tool enhances facial features—eyes, mouths, and skin texture—without distorting identity.
It’s ideal for portraits where fine facial details may have been lost due to age or scanning artifacts.
🎛️ Step 5: Fine-Tune with Manual Controls
Now comes the fun part—customization. Use the sliders to fine-tune:
- Remove Blur: Clean up soft edges without over-sharpening.
- Noise Suppression: Reduce digital noise or film grain.
- Detail Refinement: Adjust how much texture or sharpness is added.
Each image is unique, so don’t be afraid to experiment to strike the perfect balance between restored clarity and natural aesthetics.
💾 Save and Compare
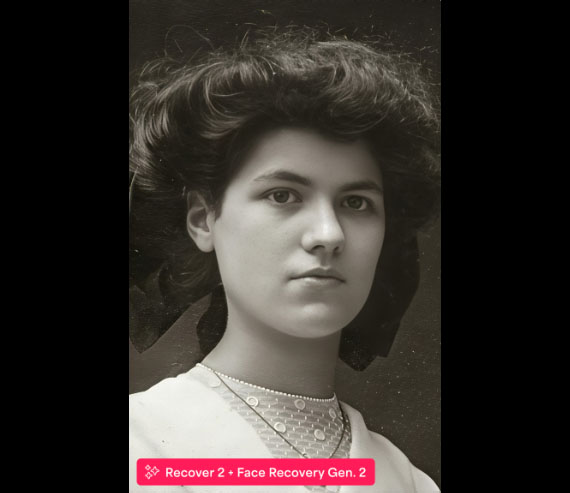
Once you’re happy with the result, save your upscaled image. For comparison, keep the original handy—you’ll be amazed at how much detail is brought back with minimal effort.
Final Thoughts
Whether you’re restoring heirloom portraits or breathing new life into found vintage images, Gigapixel AI’s Recover v2 and Face Recovery tools give you professional-level results with just a few clicks. It’s a must-have for photo preservation enthusiasts and retouchers alike. Currently $15 off today.
Deal ending soon: Gigapixel A.I. Version 8.3
Got any before-and-after results you’re proud of? Share them in the comments or tag us—we’d love to see what you bring back to life.
Like This Article?
Don't Miss The Next One!
Join over 100,000 photographers of all experience levels who receive our free photography tips and articles to stay current:


Leave a Reply