For most of us shooting in harsh light under the mid-day sun or using studio lighting for that contrasty look, bags under the eyes are a part of life—something that we have to deal with on a regular basis. Different people have different approaches to editing their images and getting rid of these. In this video, photographer Dani Diamond shares a very simple and yet surprisingly effective method using Photoshop that promises to get rid of those black bags from our images:
Why the Patch Tool is Ineffective
The patch tool replaces not only the skin tone but also the skin texture, making it appear unnatural.
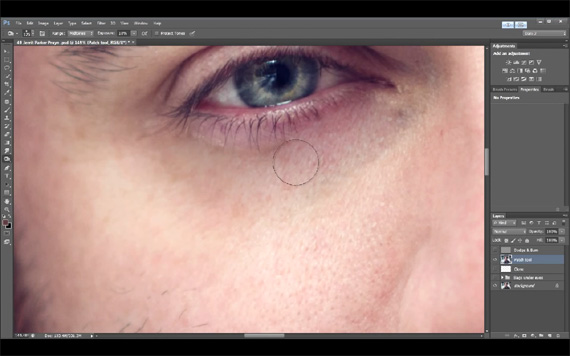
The patch tool will not only replace the skin tone but also the skin texture.
As can be easily spotted in the above image, the patch tool replaced not only the tones but it also ‘grafted’ the pores. Certainly, this is not what you want to have in your portrait images!
Why the Clone Tool is Also Ineffective
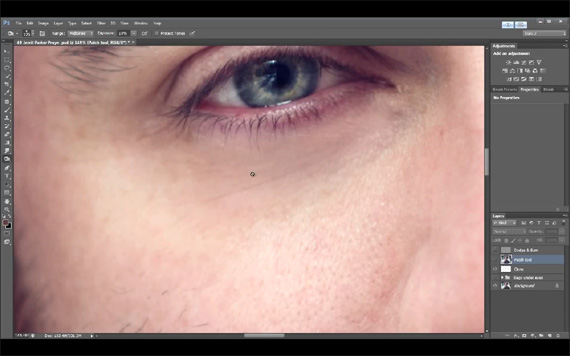
The clone tool does a better job than the patch tool, but it blurs out the skin texture.
Results of using the clone tool (pictured above) is not satisfactory either. It does a better job of patching the skin tones but in the process smudges the skin texture, because it was used at less than 100% opacity (as is the case in a majority of edits).
Why Dodge & Burn Doesn’t Work Either
Diamond explains this by saying,
“The reason why [dodging and burning] does not work is because you are not replacing the tones, you are just making them lighter, and they are different tones than the general area. So, a lot of times what will happen is that if you dodge it too much, it’s going to start turning gray and it’s going to completely lose the tones that it had.”
The Right Way to Remove Bags Under Eyes
Diamond samples the tone that he would be using to replace the tones that are problematic using the Curves tool.
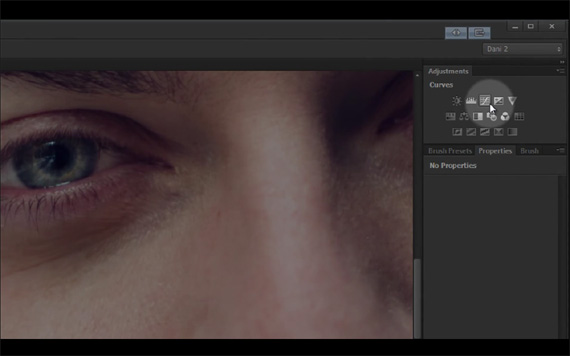
Create a new Curves layer.
1. Create a new Curves layer (remember to choose the curves symbol and not the mask).
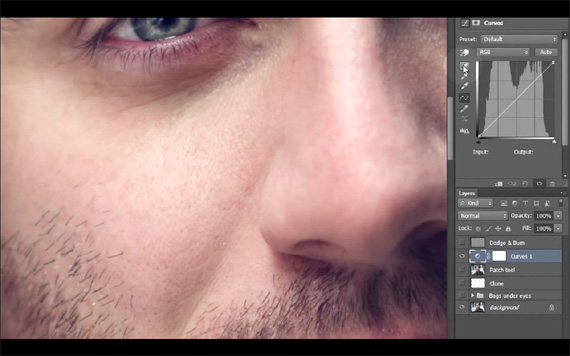
Select the eyedropper tool.
2. Sample the preferred tone to replace with by choosing the top eyedropper tool.
3. Make the sample.
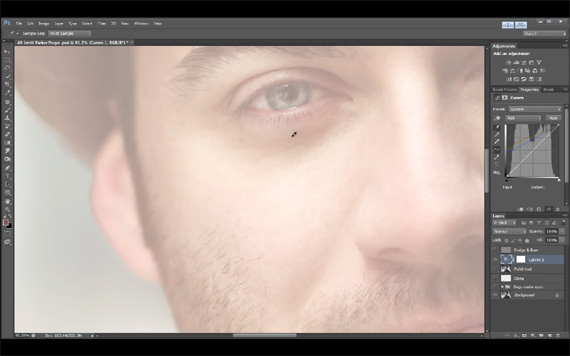
Select the skin tones to replace.
4. Select the tones that you want to replace.
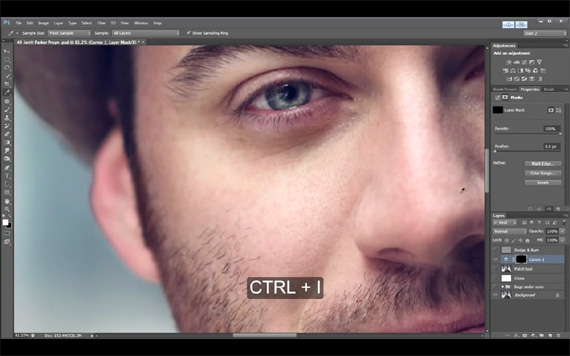
Invert the Curves mask.
5. Go to the curves mask and press Ctrl+ i to invert the mask.
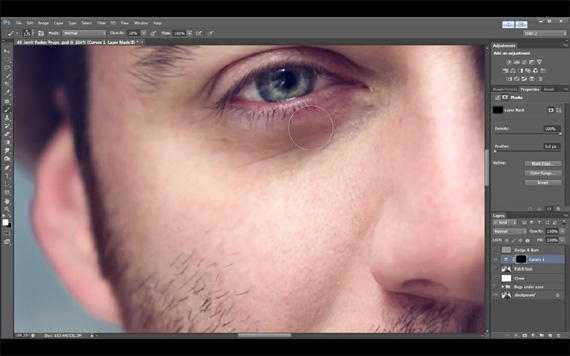
Select a brush, change the opacity, and start painting.
6. Select a brush, turn the opacity to between 10-20 percent and start painting to replace the tone.
7. If you get carried away and do a bit too much, don’t worry. You can always bring down the opacity of the adjustment layer later on.
8. Repeat the process for each eye, and each time sample a different tone to replace with, since the tones on either side of the face are bound to differ.
Here are the before & after shots:
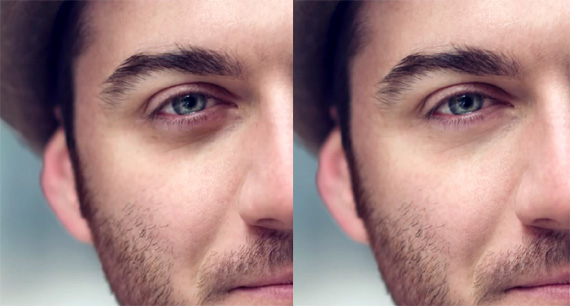
Before / After
A truly versatile method!
Just when you thought this was only for those black bags… wait! This technique works equally well in other situations, e.g., when your model has make-up on her face but not on the shoulders and neck. This process helps to balance the skin tone in general.
Like This Article?
Don't Miss The Next One!
Join over 100,000 photographers of all experience levels who receive our free photography tips and articles to stay current:




totally agree , all good until you try to select tones to replace. The only step not explained.
Useless! Step 3 & 4 aren’t explained.
How do you select tones to replace? I can’t do step 4 as I don’t know how to do that and directions don’t show how to do that.
Did you even read step 2, 3 and 4? They are basically
2. Sample color to replace using top eyedropper
3. Sample color to replace
4. Sample color to replace
Learn to use English, man
Terrible, because on step 4 (Select the skin tones to replace) it isn’t explained HOW to do this, after the previous step is done… Useless tutorial to me!!!!!
Not explained well enough for me. But I thank you for the nice post. I’m not a Photoshop pro, but basic options could easily be covered to clarify. Sometimes the eyedropper is sampling black level and also: why do you say click on the “Curves” symbol when your example doesnt have a curves symbol, your video has a “circle” that youre clicking on. I know this is basic for people in it all the time. but I’m completely derailed.
@Clayton Try holding Ctrl while sampling the color. Works in CS6 on a PC. Very nice tutorial indeed.
I can see the effect of what you’re doing, but for the life of me, can’t get the color sampling down in PS2017. I’m missing something simple, I know. I sample the skin tone I want to use, but that’s where it dies for me.
Great article Rajib. Love that you wrote it out clearly, I will forward people to this post. Can you please link to my facebook page instead of my website. https://www.facebook.com/DaniDiamondPhotography
Agreed! Very nice and very useful tutorial. But I don’t understand why this works. Can someone explain what each of the steps in curves is accomplishing? Thanks in advance.
Nice tutorial :)