We’ve compiled thousands of photography tips for photographers of all sorts, from beginners to pros. Follow us for new tips every day, all from the world’s leading photography experts.
What puts off most people from starting a hobby such as bird & wildlife photography? – it’s simply the cost. A Canon EF 500mm f/4L IS USM Super Telephoto Lens will cost you about USD 6,000. Apart from the price the other negative aspect is the weight. This beauty weighs in at 8.5 pounds! Imagine trekking through the forest or the jungle for several hours lugging this weight on top of your other photography gear. When out in the field taking wildlife shots, it’s important to approach your subject with patience and not to get too close.
Exposure compensation is what you can do to override the exposure settings set by the camera’s metering system. Assuming you have set the ISO to a specific level, eg. ISO 100, the metering system in your camera measures the amount of light in the photo and tells you the aperture and shutter speed needed for a correct exposure. There are usually 3 types of metering methods used in today’s DSLR cameras. Most cameras use multi-segment metering as the default metering system. This metering system measures the brightness in several areas in the photo and finds an average (emphasis varies depending on the camera).
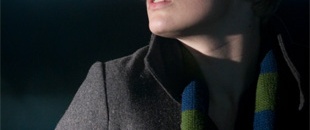
1) Never shoot your subject head on! Did you know when you photograph a person with both of their shoulders and toes pointing at you, you are creating a very unflattering image? The body position creates a block to the flow of light. The broad shoulders add at least 10 pounds to your subject. If you are photographing a quarterback or linebacker, then go for it, but if not don’t do it! Instead, turn your subject at an angle away from the camera. If the head angle is correct, you should not be able to see the subject’s far ear.
Taking photos with a flash often gives ugly results. Washed-out, flat, phony-looking faces with monstrous makeup can ruin your memories of any special occasion. Everything else is so dark it’s useless. Here’s how to take great, natural-looking portraits and photos in low or very low light. While written for digital cameras, many old film cameras can use these tips, too. The overall strategy is control or compensation for low light, and using some simple built-in controls on your camera. The key to getting them to work the way you want is practice, practice, practice.
Join the discussion on PictureCorrect’s New Facebook Page. 15 comments in the first 20 minutes, come join this discussion: What is your Photography-Related New Year’s Resolution? Find the discussion here: What is your Photography-Related New Year’s Resolution?
The most important tip that hardly anyone talks about is ‘Train Your Eye’. The eye of a photographer is his or her most important tool. Train your eyes to see light and you are on your way to creating awesome images. Train your eyes to differentiate 2D from 3D and your pictures will suddenly have volume. Teach them what is contrast and they will identify detail. You will create amazing images as long as your eyes make decisions on what to include in your photograph and what to eliminate, the choice of angles and light.
The Power Of Prime Lenses A huge range of focal lengths in a single optic are made available with modern zooms. Companies or people who design lenses work with a single focal length. Hence, chromatic aberration or distortion is minimized. However, designing zoom lenses can mean that compromises are often times necessary. This means that […]
What is a wedding? For a photographer it’s nothing but business. For the bride and groom it’s the most important day of their life. A day in which two lives take a decisive turn, for the better or for the worse. So a wedding is undoubtedly a very important even for at least two people and their immediate families. The photographer must be aware of this, even though for him/her it’s just another day at work. Why is this? Because from him/her and from him/her alone the memories of this decisive day will totally depend upon.
Photographing sunsets and sunrises can produce some of the most beautiful images you will take. Surprisingly, these wonderful scenes are not that difficult to photograph. This article will give you a few tips to make your sunset and sunrise images the best they can be. The best places to take the pictures would be beaches, plains, deserts, or anywhere there is less obstruction of the views. However, you can get great sunset and sunrise pictures anywhere if you are creative and know a little about picture composition.
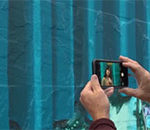
A night-time photo shoot often presents a problem or two, especially when including an element of interest in the background such as architecture. In most cases a tripod or some other method of stabilizing the camera will be necessary due to the slow shutter speeds used with low-light photography. But even with a tripod, our subject needs to remain somewhat statuesque to prevent blurring. If you’ve ever tried portraits at night, you’ll know that getting clean sharp shots is almost impossible when there’s any kind of movement.
We are always looking for more interesting and insightful photography tips and techniques to share with our readers. We would love to publish an article by you if you are interested in writing for us. See what we are looking for and get in touch.