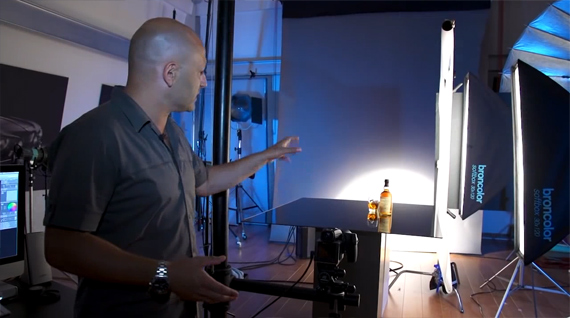
Despite the fact that product photography is among the most prolific and inescapable features of modern marketing, people often ask me, “Product photography? What’s that?”. Products and models are the two cornerstones of commercial advertising, but while there is a great deal of understanding of how fashion photography affects us as viewers, the way we absorb a product is less widely discussed. The quality of light, the colours used, and the choice of props and backgrounds all subtly communicate an idea about the item, brand, or company. Achieving these setups can be an intricate and complex endeavour; in the following video, UK photographer Karl Taylor walks us through a typical lighting setup on a bottle of high-end scotch whisky:
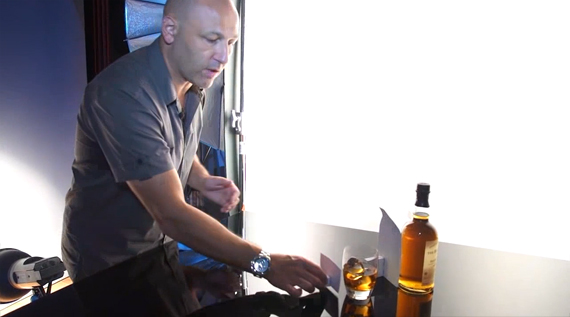
Everything in this composition is arranged to describe the product visually. It isn’t summed up in flavours so much as feelings – the soft, gentle light relaxes us while the amber colour make us feel warm – an effect which is only heightened by the golden reflections. The rich blackness that surrounds the product isolates it in our mind as being singularly important, enough so to warrant some repetition (the reflection in the glossy acrylic below). All these things reflect the way whisky makes a person feel, and why they’d want to drink it. All these things would have been carefully considered when Taylor initially set up his shot.
Product photography can be a fickle subject because it demands a strong understanding of light’s behaviour and how to control it effectively. Extreme attention to detail must be used to identify problems which appear small in the studio but can become huge in the final image, and it takes a lot of creativity to solve the various lighting problems you’ll run in to. That said, product photography can be done with simple equipment, as Taylor mentions in the video. Expensive studio lights like his are handy because you can adjust the light and see it change in real time, but speedlights can be used as well – you just have to take a lot of test shots. The third option is continuous lighting which, thanks to compact fluorescent bulbs which emit minimal heat, can now be accessorized almost as extensively as strobes and flashes.
More important than the type of key lights you use are light modifiers. These are just a few things you’d need on a typical product shoot:
- Reflectors – They can be as small as a piece of cardboard or as large as a wall, and are used to bounce light back into the frame. They can come in white, silver, gold, or any colour that you want to reflect onto your subject. In the video, Taylor uses a few small, gold-coloured reflectors behind and to the left of the bottle and glass.
- Scrims – This is any translucent material that is used to diffuse light. He uses a large scrim to soften his two key lights – he calls it a “trace” because it’s made of tracing paper, but other materials can be used as well. It is often called a “silk” because that fabric is commonly used for the purpose. It can be hung, as Taylor has it, or stretched over a frame and held in place.
- Gobo – Short for “go-between”, these are black cards that block light from shining in any direction. He also calls it a “flag”.
The best practice when shooting products is to set your camera up on a tripod and arrange your product within the frame, checking the viewfinder and making test shots and minute adjustments as you add to (or subtract from) your composition until it is just the way you want it.
Like This Article?
Don't Miss The Next One!
Join over 100,000 photographers of all experience levels who receive our free photography tips and articles to stay current:


Thanks for an excellent tutorial.
It was very informative to see the step by step process that created created the final evocative image.
Hi Ashley, I was wondering the same as this? I have been tempted to buy Savage translum.
I cannot find anywhere that sells tracing paper wider than 1m. Can anyone adivse in the UK or Europe?
James
I use a roll of translum by Savage to diffuse my soft boxes further. Will this give the same quality of diffusion?
Great post and great video by Karl.
Product photography is great because you can make the ordinary household object or drink, look beautiful with lighting and composition and tone.
I’ve recently been doing a lot of Product photography for my portfolio which is on my website.
Where can i buy the full tutorial…
Thanks for the detail info, specially for the video. It save my time and helps me lot.
Wow ! Thank you…
I am currently in the process of taking my product photography to a higher level, mostly due to that I had the chance of getting into the business by a slip of chance when I did portraiture of children and the children’s mother asked me if I could do some shots for her company. Which seems to be a company in the beauty business and they are in high demands for photos of their products. Now after some hundred products in a week I’m getting to the point where I actually believe this is both fun and lucrative business. Fun because it is a real challenge to produce fast when needed and also the creative side. Not to mention the skills you must have to actually do this and make it look good.
So with all this said, I’m very thankful to you that you share your knowledge like this. It’s a great resource and I can only send my best wishes and thankfulness…
Thanks for sharing this, it was very informative :)
Wonderful way of speaking.Not only showed all details about this difficult art of lighting glass but also in a way that people from the whole world can understand, because your very good pronunciation.
Love how you broke down the lighting and reflectors to show how you achieved the great final image – thanks for the insight.
Thank you. A very interesting tutorial.