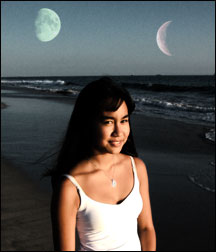
Introduction: This tutorial is to help you learn how to add colorful planets to the background of any photo. You can also change the planets to any color that you wish. This technique is great for special effects pictures. Once you have your picture open in photoshop:
1. First of all you will need to get a photo with a realistic moon, I would recommend the one on the left which can be downloaded at: jilt33.com/supernova/luna.html
2. Then add whichever versions of the moon to your photo that you wish. This step is just like a previous tutorial where I showed you how to add the moon to a photo except that we will be adding more than one version of the moon. If you need more help with this step please refer to “How to Add the Moon to a Photo.”
3. Then select the layer with one version of the moon and go to (Image>Adjustments>Photo Filter).
4. Then select the color you would like, for this photo I used green.
5. For this photo I used a density of 30, the more density you use the more color is applied.
6. Then repeat steps 3 through 5 with the other moon layer selected with a different version of the moon, and apply a different coloring. For this photo I used red for the planet on the right. Again, this tutorial is probably going to be very confusing if you don’t refer to “How to Add the Moon to a Photo.”
Like This Article?
Don't Miss The Next One!
Join over 100,000 photographers of all experience levels who receive our free photography tips and articles to stay current:


Leave a Reply