Ready to give your images an entirely new feel? For those of you who love working with textures in Photoshop, this tutorial walks through the new Texture Effects and the tools you need to rapidly speed up your workflow. For those of you who haven’t used textures with your images before, Texture Effects straightens the learning curve giving you the power to quickly create amazing images, without the headache of traditional texture applications. In this tutorial we’re going to look at how to use the program to quickly create a high impact grunge effect.

Learn how to accomplish the following in this tutorial:
- Applying basic image adjustments to prep your image for textures.
- Using the Split Tone, Color Overlay, and Texture Adjustments to tone and color your image.
- Using the Dust and Scratches, and grain adjustments to add dirt grit and grunge to your image.
1. Getting Started

Before
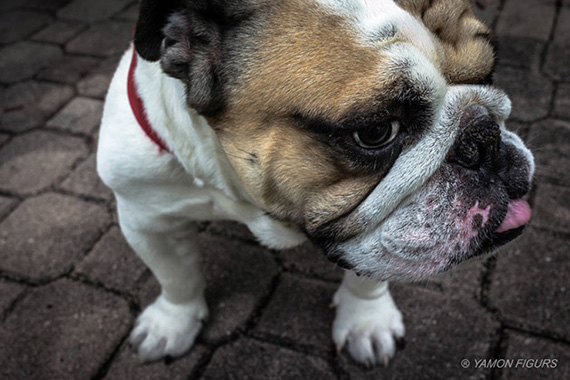
For this demo I’ll be using this image by Yamon Figurs, which you can download for use here.
It already has some basic post processing done but this puppy looks kinda upset, everyone knows that bulldogs rock so let’s give him the style he deserves. Texture Effects works as a standalone product but it also works great as a plugin. So this time lets open texture effects through Photoshop. If you don’t have Photoshop then just open up texture effects, open the image and skip to step 4 of this section.
- Open your image in a host editor that supports layers. For this demo I’ll be working with Photoshop CC as my host editor.
- Duplicate your background layer (ctrl/cmd + J).
- Then apply Texture Effects from the Photoshop Filter menu.

Presets
- Texture Effects will open and immediately give you a preview of the featured presets inside of Topaz Texture Effects, which right off the bat would normally give you a great place to get started. We want to start from scratch, so click the New button in the upper right hand corner. This will reset our image to have no adjustments or effects applied.
2. Starting Adjustments
Now that we have an image without any effects applied we’re ready to start building our own. A great place to start is always a Basic Adjustment so you can get your contrast and color the way you want for the look you’re trying to achieve.
Click the Add Adjustment button then select Basic Adjustment. We’re wanting to get a bit more contrast and sharpness out of the image so I’m going to apply the following settings:

Basic Adjustments
- Brightness to .77
- Shadow down to -.02
- Highlight to .64
- Clarity up to .39
- Saturation to .14
- Temperature to -.02
- Tint up to .03
3. Split Tone
Now that our puppy has a bit more pop, let’s give him some tone. click on the Add Adjustment button and select the Split Tone adjustment. Split Tone allows you to give a different color tone to the highlights and shadow of your images. It’s a great way to change the mood of your effect. We want to get some color but we don’t want it to overwhelm the contrast of the basic adjustment.

Split Tone
- Highlight Saturation up to .23
- Highlight Hue to a nice Orange at .06
- Shadow Saturation to .42
- Shadow Hue to a dark blue at .60
- Balance is fine at 0
- Opacity down to .84 to blend the adjustment in with the image.
4. Film Grain
The tone is starting to look more like what we want so let’s start adding some grain and grunge to our bulldog to show that he’s got attitude. So select Add Adjustment then click Film Grain.

Film Grain
- Size 3.32
- Strength .38
5. Posterize and Masking
The ’90s grunge bands always kinda had a graphic look. Since our bulldog is a rocker too, we want to get a little graphic with this image as well. For that we’re gonna add the Posterize adjustment next.

Posterize
- Crank that Depth up to 11
- Details up to .93
We’re getting a nice look for the background but we’re also losing some of our details around the eyes and face. Let’s mask out our effect so it gives a little separation between our rocker bulldog and the street he walks.
- For Mask, select a spot mask, then click on the center center button and drag the mask over the center of the bulldog’s face. Just like in other Topaz products you can transform your mask by clicking and dragging the handles of the mask (little white boxes) until you get the shape you want. Then move your cursor just outside the mask to rotate it to line up with the bulldog’s head.

Mask
- Once you’re done click the center center button again and click Invert to apply the effect outside of the mask.
- Transition up to .84 to feather the effect more
- Density up to .17
6. Dust & Scratches
Now let’s get into the textures part of Texture Effects. Add the Dust/Scratches Adjustment.

Dust/Scratches
As you’ll immediately see, Texture Effects comes preloaded with a variety of different texture types, dust and scratches being just one of those. We don’t want to browse through them all we’re just looking to get a little dirty, so click on the dropdown menu inside the adjustment and select Dirty. There are several options preloaded under each category but for our purposes we want to show that our pup ain’t afraid of the mud.

Dirty Texture
- Select the second Dirty texture on the top row
- Turn the Size up to 1.19
- Leave Keep Aspect Ratio off, (this makes the texture default to its natural aspect ratio and not to your image.)
- Turn the Opacity up to .78
- Then crank the Color Strength up to .83
- Once you start moving the color slider you’ll realize texture effects doesn’t just allow you to choose and apply textures but also lets you tone and color them and most other adjustments independently. Slide the Color slider over to about .12
- Then in order to get the texture where we want it, we’re gonna move it a bit. Click the Move button, and drag your texture over a little to the right and down to get the bulk of the texture off our dog.
7. Inverted Textures
Every rocker has a dark side, our bulldog is no different, I like the texture we were using before so we’re gonna apply the same Dust/Scratches adjustment and texture again.

Inverted Textures
- Select the Dirty category under the Dust/Scratches adjustment, then click on the same texture we used before except this time:
- Click on the Flip H (horizontal) button.
- Click the Flip V (vertical) button and click Invert.
- You should now see the same texture as before in the opposite corner except this time in black. Click on the move Move button and drag the texture over until it’s sitting in the bottom right corner just adding a little dark accent to our dog.
8. Color Overlay
I think our bulldog would be proud of what we have so far but I’m not liking the color of the image. Let’s add a Color Overlay adjustment to our dog.

Color Overlay
- For the color pick a sea-foam green.
- Then in order to blend the overlay in, change the Blending Mode to Color. You’ll notice as you scroll over Blending Modes that your image updates with a realtime view of what the image would look like with the blend mode selected. Just another way to help you save time and get the effect you’re looking for.
- It’s a little strong so let’s roll the Opacity back to .34
9. Brighten Up
He’s looking good but a little dark, we want to see the passion in his eyes so let’s add a Basic Adjustment to rein in the shadows in our image.

Brightness
- Brightness .16
- Shadow up to .25
- Bring the Highlights down to -.16
- Bump the Clarity to .23 really bring those edges back in
- Then bump up the Saturation a little more to .22
10. Using Texture to Tone
I’d like to showcase one other adjustment type here it’s a fantastic way to add both Tone and Texture to your image. Add a Texture adjustment. As you can see, apart from dust and scratches, borders, and light leaks, Texture Effects comes with a plethora of image textures you can apply to your image out of the box. I’d like to see a bit of a brighter color at the top of the image around the bulldog’s face but darker around his feet to push your eyes toward his.

Color Wash
- Click on the dropdown and select the Color Wash Category
- Near the bottom you’ll find a few textures that have a nice fade to them, select the one that goes from cream to dark near the bottom of the list.

Flip V
- Click the Flip V button to flip the texture over so the light section is on top.
- Bring the Opacity down to .42
- Push the Saturation to a -.32
- Crank the Color Strength up to .49
- We want the texture to match our image more, let’s roll the Color over to .59
If you’d like to see your before and after image just press the spacebar to see the before at anytime. When you’re ready click OK to commit the changes to your Photoshop layer.

Final Image
There you have it, from humble sad city pup to hardcore rocker dog in minutes. I wonder if he’ll ever go back to being a good dog again.
Was this tutorial helpful to you?
Learn more here: Topaz Texture Effects
Like This Article?
Don't Miss The Next One!
Join over 100,000 photographers of all experience levels who receive our free photography tips and articles to stay current:


Thanks for sharing
Nice tips…
Nice tips…Thanks for sharing
Picture looked way better without the texture applied. Lesson: learn when to/not to apply a texture.