Photographing an eclipse is an awe-inspiring experience, but what do you do with those images afterward? In this video tutorial, we’ll walk you through two creative ways to assemble your eclipse photos into striking composites using Photoshop. Follow along with Matt Kowski as he demonstrates the process step-by-step:

Getting Started: Preparing Your Images
Before diving into Photoshop, ensure your eclipse photos are properly edited. One common adjustment is to tweak the black slider to the left, making the dark areas truly black. This helps avoid any unwanted white edges that can interfere with the composite process. Once edited, synchronize the adjustments across all your photos.
Option 1: Stacking Photos for a Composite
- Import Your Photos: Select all your edited photos, then open them as layers in Photoshop. You can do this via Lightroom by selecting the photos, then choosing Photo > Edit In > Open as Layers in Photoshop. Alternatively, use Adobe Bridge by going to Tools > Photoshop > Load Files into Stack.
- Set Up Your Canvas: Decide on the aspect ratio and layout for your composite. You can opt for a panoramic view or a standard photo aspect ratio. Use the crop tool (C) and set the fill to transparent to adjust the canvas.
- Add a Black Background: Select the bottom layer, then add a new layer beneath it. Fill this new layer with black using the Edit > Fill menu or a keyboard shortcut.
- Arrange and Blend: Position each phase of the eclipse in your desired layout. Change the blend mode of each layer to Screen to make the black areas transparent, revealing the composite underneath.
- Align Your Images: Use rulers and guides to align your photos precisely. Press Ctrl+R (Windows) or Cmd+R (Mac) to show rulers, then drag guides from the rulers to help position your layers.
Option 2: Averaging Photos for Enhanced Detail
- Create a Smart Object: After stacking your photos as layers, select all of them, right-click, and choose Convert to Smart Object. This combines them into a single smart object layer.
- Average the Layers: Go to Layer > Smart Objects > Stack Mode > Mean. This averages the tones across all your photos, enhancing the details.
- Refine with Camera Raw: Apply additional adjustments using the Camera Raw filter. Enhance the blacks, increase exposure to reveal more detail, and tweak temperature and clarity for the best visual effect.
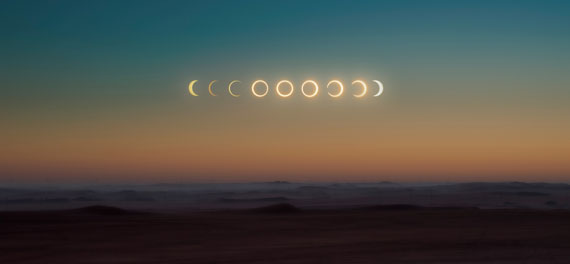
Photo captured by Abed Ismail
Final Touches
- Add Text: Enhance your composite with some text to label the event or what eclipse it was. Use a clean, professional font like Montserrat, Raleway, or Helvetica. Avoid overused or unprofessional fonts like Comic Sans.
- Optional Color Overlay: To add a subtle color tint, create a new layer, fill it with a chosen color (like orange), and set the blend mode to Color. Adjust the opacity to achieve the desired effect.
For further training: The Photoshop System
Like This Article?
Don't Miss The Next One!
Join over 100,000 photographers of all experience levels who receive our free photography tips and articles to stay current:


Leave a Reply