
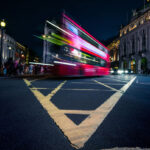
Before Changes
After Changes
This tutorial is to help you learn how to create a silhouette from a photo that didn’t quite have the right exposure for it. For this photo, it was supposed to come out as a silhouette but it was a little too overexposed. But this technique will work well for any photo that has a bright light source in the background. Ok, once you have your picture open in photoshop:
1. Create a New Layers Adjustment Layer (Layer>New Adjustment Layer>Levels).
2. Adjust the outside sliders so they fit the whole color range. For this photo I had to slide the left one in.

3. Adjust the exposure so it is more balanced and on the verge of being a silhouette. For this photo I had to slide the middle slider slightly to the left.
4. Create a New Brightness/Contrast Ajustment Layer (Layer>New Adjustment Layer>Brightness/Contrast).
5. Decrease the Brightness, for this photo I decreased it by 41.

6. Increase the Contrast, for this photo I increased it by 40.
For different photos, the process and amount of adjustment won’t be exactly the same. But with this technique you can probably make the most realistic silhouettes.
Like This Article?
Don't Miss The Next One!
Join over 100,000 photographers of all experience levels who receive our free photography tips and articles to stay current:


Leave a Reply