Sil·hou·ette [silo͞oˈet] noun: the dark shape and outline of someone or something visible against a lighter background, especially in dim light.
Silhouettes can be a fun and beautiful way to illustrate a scene and are surprisingly easy to create. Photographer Gavin Hoey shows us how to perfect the silhouette with a one light setup:
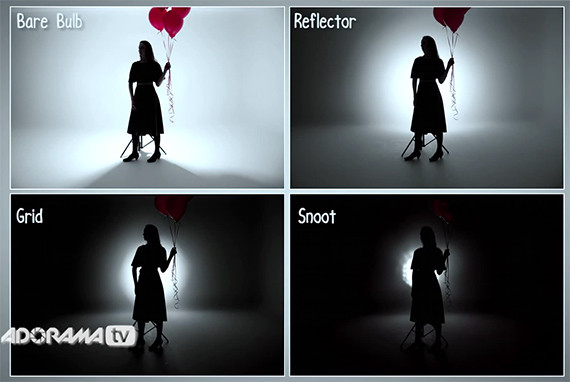
Hoey tested out four different types of light modifiers on the Streaklight 360 to figure out which ones matches his vision best.
- bare bulb
- reflector
- honeycomb grid
- conical snoot
Each of the modifiers provided substantially different qualities of light.

The four types of light all shot at 24mm, f/8, 1/60s, ISO 100.
The bare bulb flashed light everywhere and created undesirable shadows in front of the model.
The reflector (similar to using the wide end of zoom on a speedlight flash) contained the light; there was not as much spill as with the bare bulb.
The honeycomb grid and conical snoot sent the light in one direction, creating tighter circles of light that were too small for the look Hoey was going for.
The reflector provided the style Gavin required. The resulting image was good but needed a bit of quick tweaking in Photoshop.
Silhouette Tweaking in Photoshop
1. In Camera Raw, pull the Blacks slider far to left to create a fully black silhouette.
2. If the Blacks slider has darkened other areas of the photograph, they can be edited using the Adjustment Brush. Increase the exposure and add saturation if necessary.
3. Use the Spot Healing Brush to paint over tripod stand legs or unwanted spots in the photo.
It’s really that easy to create a well-composed and well-lit silhouette!
Like This Article?
Don't Miss The Next One!
Join over 100,000 photographers of all experience levels who receive our free photography tips and articles to stay current:


Leave a Reply