When you see a picture of a cold beer in an advertisement, you probably don’t realize the attention to detail that went into it. Here, Lee Morris from Fstoppers gives you a step by step demonstration on how to set up lighting for illuminating a product shot in studio. It’s no easy task:

Backlight
The first light in the mix is a backlight. Placed right behind the bottle and fired straight through is a Yongnuo speedlight. It creates a nice glow that is synonymous with this kind of product shot. A PocketWizard is attached to the speedlight so that it can be fired remotely.

Backlight
The flash is set to its lowest power.
Top Light

Backlight and Top Light
The top light is set up right on top of the bottle. An Fstoppers Flash Disc is the secret ingredient in this shot. As explained in the video, the Flash Disc works in really tight spaces where using a bulkier softbox may not be feasible. The main light, which is a SB-910, is set up with a Flash Disc and set to slave mode (it fires as soon as it sees another flash fire).
Side Lights

Backlight, Top Light, and Side Lights
The side lights refine the edges and make them more prominent in the final shot. Two more Flash Discs are used for this purpose. They accentuate the shoulder lines of the bottle. Two speedlights—one a SB-80 DX and another a SB-800—are used for this purpose.
Key Light

Backlight, Top Light, Side Lights, and Key Light
The key light for this shoot is a SB-800. It’s gridded so that the light is more focused and illuminates the bottle’s label. Each of the flashes used in this shot are set at different power outputs. This helps to get the look right.
Lighting Setup
Here’s what the full light setup looks like:

Lighting Setup for Shooting a Bottle of Beer
Details and Adjustments
Once the lighting is set, it’s time to get into the details. To make the beer look cold, ice was placed around the base of the bottle, and a spray of a water/glycerine mixture created the appearance of condensation.

Pieces of ice and a spray of water/glycerine mixture perfect the shot.
Morris upped the power on the backlight to increase the glow from the bottle.
Post-Processing
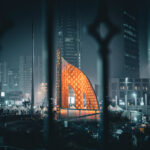
The nice thing about photographing on a plain backdrop is that you can easily edit in a different background in post-processing. Morris went for a city lights look:

Final Image
The video here really shows you that there’s more to product photography than simply setting a beer on a table and taking a few shots.
Like This Article?
Don't Miss The Next One!
Join over 100,000 photographers of all experience levels who receive our free photography tips and articles to stay current:


Leave a Reply