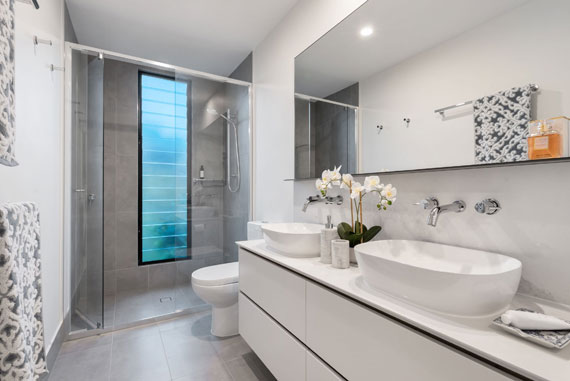
Ever shared or been privy to more detail than you should when viewing or posting real estate photographs? Unwanted reflections on glass and mirrors can be both embarrassing and unattractive. Joe Gustafson has some clever tips to share on how to remove the glare in your shower and bathroom photography.
Step 1: Shoot With Artificial Light
When taking photographs of real estate, you can use artificial lighting to improve your results. A handheld strobe or flashlight is particularly useful for showers. Take multiple photos, including naturally-lit base images and others with your artificial light.
Ideally, hold the light inside and above the shower to give the best results. You can then layer or stack these images using photo editing software like Photoshop. Remember to shoot with a tripod and not move it or your camera, so your images line up perfectly. More info on camera settings for interior photography.
Step 2: Choose The Best Images
Before you start stacking your images in Photoshop or your editing software, go through them. Choose the best shots as far as clarity, sharpness, and lighting are concerned. You’ll need an ambient layer free from artificial light as your base.
Plus, at least one artificially lit-up image to stack it with to create a composite image. Once you have selected your images in Lightroom, you can export them to Photoshop or similar editing software.
Step 3: Create Your Composite Image
It’s time to stack your images to create them into a reflection-free composite image:
- To start, your ambient or base layer should be at the top of your stack.
- Switch it off and create a layer mask on the other artificially lit images.
- Use command I to invert each layer mask.
- Then, select the white color for your brush.
- You also want to set your flow to lower (around 5) for a gentler, subtler, slower, more controllable edit.
- Use it to paint yourself or any artificial lighting equipment out, including on mirrors and reflective surfaces.
- Next, select your ambient or base layer, add a mask to it, and invert it, too.
- Paint any sections with the same brush settings to improve the overall lighting and brightness balance.
- Then, flatten the image.

Bathroom photo captured by Steven Ungermann
Step 4: Edit Out Any Final Reflections
At this point, there may be some smaller, more subtle reflections you wish to edit out. To do so, first duplicate the composite image. You can use the patch tool to highlight and slide any darker reflections out. Try to focus on the most obvious ones, as you may not need to eliminate them all. Joe also uses the dodge tool to brighten darker reflective patches afterward.
Step 5: Final Lightroom Edits
Once the reflective edits are done, you want to flatten them and move the composite image back into Lightroom. Here, you can add the final lighting edits. Adjust the brightness, exposure, tone, and more to create a real-estate-worthy snap. Though time-consuming, the results are well worth it!
…and that’s gonna separate you from the rest of the photographers out there… If you can provide images for them that look like this, that’s going to one-up yourself in the competition…
To Conclude:
Real estate photography really puts the pressure on photographers to capture properties in their best light. Sometimes, it’s necessary to bend the rules — and bring in a little artificial lighting and post-production editing into the mix — in order to get those results. Joe’s reflection and glare removal technique is a surefire way to level up your game!
Like This Article?
Don't Miss The Next One!
Join over 100,000 photographers of all experience levels who receive our free photography tips and articles to stay current:


