From the cosmos to the teeniest, tiniest bird, Simon d’Entremont, loves to wonder at and photograph it all. As a professional wildlife photographer, he has plenty of tips to share — particularly regarding challenging bird photography. As we know, birds move fast, flitting around and flapping their wings at speeds often imperceivable to the human eye. This movement can make capturing sharp images of birds quite challenging. In this YouTube vlog, Simon shares his top tips on how to do so.
A Telephoto Lens is a Must
For bird photography, Simon has two lenses he loves to use. His Canon EF 500mm f/4L IS II USM Lens, which produces very sharp images, but is equally pricey. And his Canon EF 100-400mm f/4.5-5.6L IS II USM Lens, which costs a fraction of the price. That said, both create almost equally sharp images, the differences between them being practically imperceptible to the human eye.
Shutter Speed is Key
Shutter speed is one of the most critical settings to master when it comes to shooting sharp images of birds. Simon’s number one trick is to shoot one over whatever mm lens you have. 1/500 for a 500mm lens or 1/400 for a 400mm lens, for example.
He also advises that photographers adjust their shutter speed according to the size of the bird. As bigger birds generally move slower, use a lower shutter speed for them — and in low light conditions. For smaller, fidgety birds or when shooting in brighter conditions, you can opt for a higher shutter speed.
Here’s a handy guide of Simon’s typical shutter speed settings for various birds:
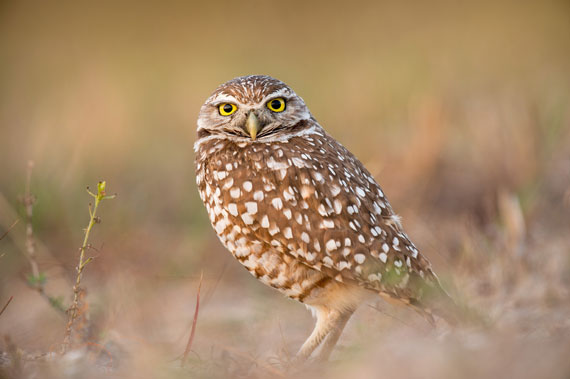
- Large birds like owls, eagles, and geese: around 1/1000-1/1250.
- Medium-sized birds like songbirds and ducks: around 1/2000-1/2500.
- Fast or small birds like puffins: around 1/3200.
- Tiny birds like hummingbirds: around 1/4000-1/5000.
Note — the closer a bird is to you, the more sensitive to its movement your camera will be. Apply a higher shutter speed than recommended to compensate.

Photo captured by Ray Hennessy
Leverage Important Camera Settings
Besides shutter speed, there are various other camera settings to adjust to improve the sharpness of your bird photographs. Aperture is one of the main ones. Simon mentions that a lens is sharper in the center than corners. That’s why he recommends photographers stop down their lenses to improve the overall sharpness of a frame.
… stopping down the lens and making the aperture smaller allows you to use the part of the lens that’s the sharpest…
To do this, he increases his aperture according to the lens aperture. If the lens is F5.6, drop it to F6.3, F7.1, or F8, and so on, to see which produces the sharpest images. Simon suggests adding one full stop to start. If a lens is F5.6, try F5.8; if F6.3, then try F9, for example.
Apart from aperture settings, your focus settings are also key, ensuring the focus adjusts as the bird moves. For bird photography, Simon always uses continuous auto-focus (AFC on regular cameras or AI Servo on Canon).
Lastly, Simon’s bird photography technique prioritizes shooting with a blurrier background. He achieves this by shooting as close as possible, ensuring the background is far away or clean. Alternatively, by using a longer focal length, 600mm on a 150-600mm zoom lens, for example.
Shoot In Bright Lighting Conditions
The absence of adequate light makes a big difference when it comes to the sharpness of bird photography. Not only should you ensure you shoot on a bright day — preferably golden hour, or in the morning or afternoon when the light is more horizontal.
The bird or subject should also be illuminated from the direction you’re shooting. This angle ensures you pick up the micro-contrast of their feathers. Keep that ISO down, too, as a lower ISO equals sharper images.
Keep It Steady
One of the biggest enemies of image sharpness is camera shake. There are a number of ways you may slightly or severely destabilize your camera, which can result in blurry images. Simon always stabilizes his images by firmly gripping both the camera and lens, especially when using longer, more shake-sensitive lenses.
Simon’s other smart stabilization tips include:
- Push an eyebrow in the eye cup and apply pressure when you’re shooting.
- Don’t “stab” the shutter button. Instead, place, touch, or roll your finger very lightly onto it.
- Tuck your elbows into your waist and move your entire body when panning.
- Focus on the part of the bird that’s moving the least to reduce internal mirror shake for DSLR cameras.
- Take lots of photos to improve your odds of capturing a sharp one. You can use burst mode continuously or sporadically.
- Stabilize your lens and camera using a tripod, monopod, or the natural terrain nearby.
Simon’s panning technique tip — to test your panning technique, photograph moving cars while panning at different shutter speeds. If you get to 1/25 shutter speed and still get a sharp image, your panning technique is very good.
Conclusion
Simon is a pro when it comes to taking sharp wildlife photographs. As one of his favorite subjects to capture, he has plenty of knowledge to share on how to capture birds. From puffins to birds of prey, he’s trained his lens on plentiful — and shared his top tips in this video!
Like This Article?
Don't Miss The Next One!
Join over 100,000 photographers of all experience levels who receive our free photography tips and articles to stay current:


