Ever take a photograph of a winter landscape and have it come out looking pale grey or even light blue? That is the camera’s white balance misbehaving, and while you can go ahead and manually “tinker” with the different settings, there is a much easier approach. Before we go into a discussion about that approach, however, let’s take a quick second to understand the underlying problem.
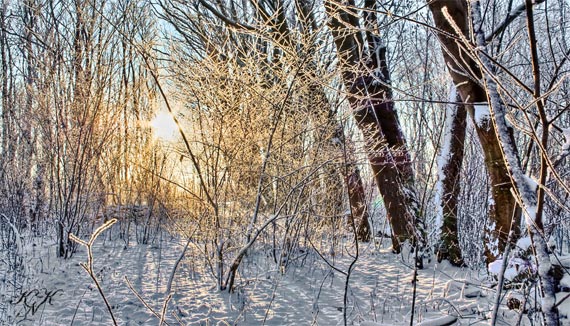
“My Backyard” captured by Kenneth Kristiansen Nielsen (Click Image to See More From Kenneth Kristiansen Nielsen)
We already said that it all begins with a bit of bad behaviour by a camera’s white balance setting. This is the method that your camera uses to interpret pure white, or more officially, it is the way that the camera is interpreting the colour “temperature” of the light source. When it is inaccurate, it gives the entire photograph a colour cast or hue that is terribly wrong.
So, if you want to get sharper and clearer whites in a photograph, such as that snow scene mentioned at the opening of this article, you have to find a way to trick the camera into seeing things correctly. This is done through the use of a “neutral reference” in the scene. Neutral means a shade that seems to be a colour that represents the way the photographer sees white in the actual scene.
For example, let’s say you are shooting a hazy day at the sea, and your scene is comprised of mostly black rocks, bluish grey water, and an equally bluish grey sky. You could use the breast of a seabird or a white shell or stone to train your camera to see white under those conditions.
Alternately, you could obtain grey cards to carry with you, thereby avoiding trouble if there is no neutral reference available. These are pre-printed cards or found objects that contain certain percentages of grey, and which tell the camera’s white balance how to adjust to a more accurate rendering of the colour temperature of the light source.

photo captured by Wolfgang Lonien
For instance, let’s say that you are focusing the camera towards a white wall. The automatic white balance may read that wall incorrectly and over or underexpose the scene. This might reveal the white wall as a pale grey instead. If you use the 18% grey card (which is the most commonly selected), point the camera at it and take a single exposure, it is going to train the camera to interpret the white wall correctly in the next photograph. You can also document the way that the camera reads the grey card in manually, and adjust the settings accordingly.
About the Author
Amy Renfrey is the author of two major successful ebooks “Digital Photography Success” and “Advanced Digital Photography”. She is a photographer and also teaches digital photography. Her educational ebooks takes the most complex photography terms and turns them into easy to understand language so that anyone, at any level of photography, can easily move to a semi-professional level of skill in just a very short time. She’s photographed many things from famous musicians (Drummers for Prince and Anastasia) to weddings and portraits of babies. Amy also teaches photography online to her students which can be found at http://www.DigitalPhotographySuccess.com
Like This Article?
Don't Miss The Next One!
Join over 100,000 photographers of all experience levels who receive our free photography tips and articles to stay current:




I think there is some confusion here, white balance cards and 18% grey cards are not the same thing.
he would explain it if he knew it himself. the guy just pasted some text from another blog to get more visitors. waste of time.
He actually explains what to do: http://digital-photography-school.com/get-your-white-balance-right-in-seconds-using-grey-card
This article is not a total waste of time and nicely written, but it does not explain what it promises to explain.
Coome on, the article does NOT explain what it promises = how to use a grey card in photography. The article should be titled “why a grey card may be needed to capture photos with acurate color.”
can u give me please authentic video link of 18% grey tutorial ? because i could not understand properly
Andreas explanation of how to set a custom white balance is absolutely correct. Even though she is using a Canon, this description works the same for a Nikon DSLR. From my experience, this procedure is basically the same for all Modern DSLRs; refer back to your user manual for specific steps for your camera. Andreas point is, setting a custom white balance, or reference, will affect the colors in your photo rendering them true, or to a color cast of your choice (individual preference). Sometimes your goal is to get as true colors as possible (ie whites are true white) in the final proof. But on the other hand, you may want a slightly off color cast for artistic affects; the point here is your using the 18% card as your reference.
I have never used a grey card to set or measure the exposure, only to set a custom white balance.
To do that (on my Canon), I take a shot – filling the frame with the grey card. Then I go in the menu, and chose to set a custom white balance. The camera tells me to select an image for reference, and I choose the image I just shot of the grey card. I then set the WB to “custom”, and I am ready to go!
The important thing here is to take the picture of the grey card under the same lighting conditions as I will be using when taking the pictures. If the lighting changes, if I change locations etc – I will have to take a new picture of the grey card, and change reference image in the menu.
If I am not mistaken, pointing the camera at the gray card and taking a single exposure means “point and lock”. Locking the exposure is done by focusing on the gray card and pressing the +/- button on your dSLR. By pressing the +/- button still, and refocusing the camera to your subject, the locked exposure will be used when firing up.
Again, that is if I am not mistaken. ;)
As others commented before; this article tells us that you CAN use a grey card, and how it helps, but as far as the title goes – “how to use a grey card” – this article falls a bit short. Some of us know that you can use the grey card to set a reference guide to the pictures following, but most will read an article like this to find out how this is actually done.
To complete an article like this, you should have added a few steps:
– How to set the grey card as a custom white balance for the photos to follow
– How to use a grey card in one image to set a reference point to other images when using different software to work with – or convert images from RAW; and
– How to use a grey card within a photo to set grey point within the image when using photoshop to edit the photo.
The article is well written, so a re-post with a few “how-to” steps would make it so much better.
Thanks
“If you use the 18% grey card (which is the most commonly selected), point the camera at it and take a single exposure, it is going to train the camera to interpret the white wall correctly in the next photograph. You can also document the way that the camera reads the grey card in manually, and adjust the settings accordingly.”
I understand the concept but not the how-to. “After taking a shot of the grey card to “train the camera”, doesn’t the camera revert to the standard white balance for the next shot? If I am using manual settings, what do I “adjust…accordingly” and how? (I’m using a Canon Xti.) These technical confusions are why I have never tried using a grey card. I’m sure it is quite simple, but I could use more specifics.
Thanks.
Unfortunately, this article doesn’t explain what to do once you take the shot of the grey card. You still have to input it in the camera as a custom white balance and this is what most people don’t know how to do. Just taking a picture of grey ain’t gonna help.