Mountains are by nature photogenic, but it is not always easy to capture their scenic grandeur in a photograph. Serious professional photographers have to use very expensive, large-format equipment to produce the image quality required for reproduction in a printed book or magazine, but for non-professional purposes, a decent 35mm SLR camera, preferably with a wide angle lens, will produce highly acceptable results.
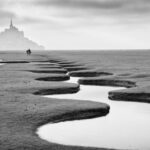
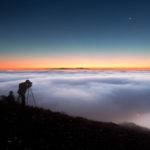
I use a Sigma 12-24mm wide-angle zoom lens on a Nikon D2X, usually at its wider settings, or a Tokina 20-35mm. Wide angle lenses are necessary to include the large physical area occupied by mountain scenes, and impart a sense of scale and space. It is a good idea to include some foreground detail like figures or buildings to emphasise the scale of the scene.
But owning the latest Canon or Nikon 35mm will not turn you into Ansel Adams overnight. Ask any photographer what is the most important element in the picture-taking process, and he will reply – the person behind the camera. The camera should become an extension of your eye, allowing you to frame the image in the viewfinder the way you see the scene in your mind’s eye. This is where viewpoint, composition, and lighting enter the equation., and although the best photographers do this instinctively, there are basic principles which you can adopt, and apply to your picture-taking, which will dramatically improve your photography.
Viewpoint is the first consideration – most places and objects, whether they are mountains, buildings, people, or your prize begonias, have an optimum viewpoint, from which angle they are shown to best effect. With large objects like mountains, there will be several viewpoints from which interesting and often dramatic images can be captured. These viewpoints are often well known, and books like The Welsh Peaks and the Lakeland Peaks by W.A. Poucher contain specific information about the best viewpoints for mountain photographs in these areas. There is also every chance that your normal walking routes will pass several striking viewpoints during the day.

The primary consideration affecting the quality of any photograph is lighting, even more so when shooting landscapes. The lighting on a particular scene can change dramatically depending on several factors – the weather, time of day, season of the year, and location of the scene.
Generally speaking, lighting for mountain photography is better early or late in the day, and from autumn through to spring, when the sun is low in the sky, producing side-lighting which emphasises the shape of the mountain. During the middle of the day, and particularly in summer, the sun tends to be very overhead, and produces lighting which flattens the contours of the landscape.
Sunlight on a crisp winters day, with snow on the peaks, often produces the most satisfying results – the air is cold and clear, intensifying the blue of the sky, and definition of the landscape is at its most pronounced. In summer, heat produces a dust and photochemical haze in the atmosphere, reducing definition, and causing the sky to appear grey and colourless, even in bright sunshine.

Finally, don’t leave the camera behind because the weather is bad – often the best results occur when the light suddenly breaks through clouds after rain, glinting off wet rock. This is where the luck comes in – all the planning in the world won’t help if the weather isn’t being co-operative, but any serious photographer will be ready for that single moment when the light miraculously appears before the gloom descends once more – if your camera is permanently buried at the bottom of your rucksack under the first-aid kit and the emergency fruit cake, and you only bother to dig it out to record that summit moment, then you’re probably going to miss a multitude of mountain photo opportunities. So keep the camera accessible – that way, if the perfect panoramic landscape does appear during your day out, you’ll be able to record it – and even if every image on the film isn’t an award-winning spectacular, photographs are a great way of recording your walks.
Simon Kirwan is a photographer with a passion for the outdoors. He spends as much time as possible visiting the mountains and wild places of Britain and the world. After visiting Nepal and photographing the Himalayas in 1999, Simon was named ‘Observer Outdoor Photographer of the Year 2000’. He has since travelled overland across East Africa visiting Kenya, Tanzania, Zanzibar, Malawi, Mozambique and Zimbabwe; in addition, he has photographed the mountain ranges of Europe including the Spanish Pyrenees, the French and Italian Alps, and the Polish Tatras.
Despite his love of travel and the excitement of visiting new destinations, Simon is equally happy to wander the hills and mountains of Britain’s countryside, especially Snowdonia, the Peak District and the Lake District where he can indulge his love of mountain walking and scrambling as well as photographing the ever-changing landscape.
www.aerial-photographer.co.uk
http://www.the-lightbox.com
Like This Article?
Don't Miss The Next One!
Join over 100,000 photographers of all experience levels who receive our free photography tips and articles to stay current:


thanks for the tips !!..i always photograph on my hikes !!..& it is a great way to keep a record of various section hikes that im doing on the Appalachian trail !!