Lightroom undoubtedly is one of the most popular software used to catalog and edit photographs. It has endless possibilities and so some users find it difficult to get the most out of it. However, by learning simple tips and tricks, you can greatly reduce the time you spend with each photo in Lightroom and be more productive. Professional photographer Evan Ranft shares his Lightroom tricks to help you.
Jump from the Import module to the Develop module
The Import module is the module that greets us when we import out photos into Lightroom and from here we all jump into the Develop module to start making adjustments to thephotos. Simply hit the “D” button to jump from the Import module to the Develop module.
Change the backdrop color
Backdrops are essentially the backgrounds in the workspace on top of which our images are overlaid. If you feel that the white backdrop is distracting, you can right click on the backdrop and choose from other darker or neutral backdrop colors.
Easily straighten your photos
A good eye is always able to tell if your photos are crooked. They tend to be very distracting. While there are various tools to straighten a photo in Lightroom, the easiest way can be to hold the command key (Ctrl in Windows) and set your own level. The level that you draw is considered as the new horizon and Lightroom automatically straightens the photo based on the level that you draw.
Switch between Landscape and Portrait crops
Let’s say you have to switch from a 4:3 landscape ratio to a 3:4 portrait ratio. Simply press the X key to switch between landscape and portrait crops in Lightroom.

Switch between landscape and portrait crop ratio by simply pressing X in Lightroom
Correct perspective distortions
Perspective distortion occur whenever you tilt your camera. Ever noticed that when you take a photograph of a tall building, the edges of the building seem to converge as we go up. This is because we tilt the camera a bit to fit all of the building in the frame. Lightroom has a feature built in to correct such distortion called the Transform module. Scroll down to the transform module and choose between various built in functions or even try out the manual sliders (if you know what you are doing) to remove vertical or horizontal distortions in your photograph.
Isolate the image you are working with
It is always a good idea to sometimes stop whatever you are doing and have a good look at where you are going with your edits. To remove the clutter on your screen, simply press the L button twice to isolate the image. Once you have had a good look at your image, press L again to bring all the modules back on the screen.
Toggle visibility of the sidebars
Based on whether or not you need the left and right sidebars while working in the Develop module, you can toggle their visibility by pressing the Tab key.
Get finer controls of the adjustments
While making adjustments, sometimes you may feel a need to have a finer control over the adjustments. This means you might want to have a better control over the slider so you can fine tune your image. There are easy ways to do this:
- Increase the size of the Develop module by placing your cursor on its edge and dragging it across to the left. Bigger sliders will allow finer controls.
- Put your cursor over the slider you are working with and press the up key (to increase) and down key (to decrease). This allows you to have an even finer control. On the contrary, if you want to have larger adjustments made, you can hold the shift key and press the up and down key.
Adjust size and feather of the brush tool
Brush tool is great for making local or targeted adjustments. If you have experience working with it then you might have realized that we need to continuously fiddle with its size. The easiest way to increase or decrease the brush size in Lightroom is by pressing the square bracket keys. “[” key decreases the brush size and “]” increases it. Similarly, to increase or decrease the feather size, hold the shift key and press the square bracket keys.
Use same adjustment settings across multiple photos
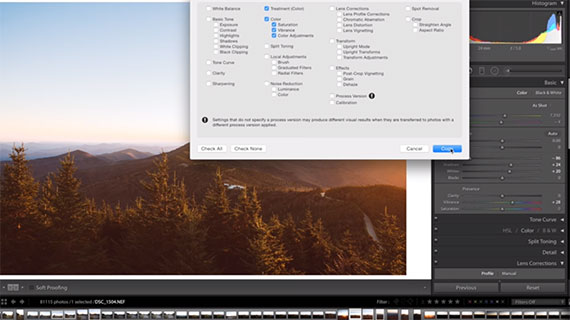
This feature comes in handy when you are photographing in situations when the lighting condition and subject do not change much. Once you are done making adjustments to one image, simply right click on the image,go to “Settings” and click on “Copy Settings…”. Next, you can choose all the setting that you would like to copy. Check all the settings that you would like to copy and uncheck all that you do not want to copy and then press “Copy”. Finally, go the image where you want to paste those settings and then right click, go to “Settings” and click on “Paste Settings“. This is a great way to speed up your work flow.

You can choose from individual settings to be copied from one photo to to others in Lightroom
Remove the unwanted tabs
Workspace is valuable in Lightroom. While in the Develop module, if you feel that you do not use some of the functions, simply right click on that tab and uncheck it. This will remove it and free up some space. If you want it back, follow the same step and check it.
Have better control over sharpening
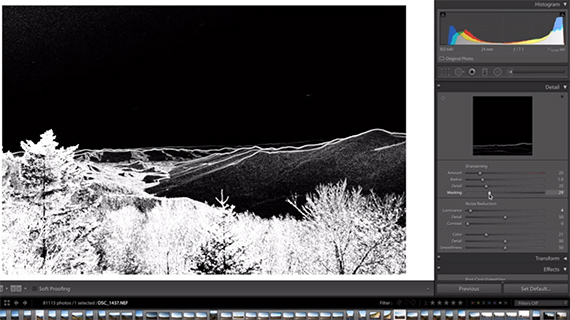
If you do not have a good control on the sharpening tool, the image can appear too grainy. If you have certain areas where you do not want the image to be sharpened then you can hold the Option key (Alt in Windows) and slide the masking slider. Doing so will make the image appear to be in black and white. Black areas will not be sharpened while the white area will be sharpened. Adjust the masking slider to sharpen targeted areas.

The black area indicates areas that will not be sharpened and the white areas indicate areas that will be sharpened.
Taking spot removal to the next level
Spot removal tools help you in removing spots in a matter of a click. But what if we have more than just a spot to remove, let’s say a scratch or a power line in your landscape photo? To do this, simply drop a spot by clicking once and then hold the shift button and drag the spot to create a line or a column.
While Lightroom can feel a bit overwhelming when starting out, learning such simple tips and tricks can help budding photographers get a grasp of this software. Did you find these tricks useful? Do let us know in the comments below.
Like This Article?
Don't Miss The Next One!
Join over 100,000 photographers of all experience levels who receive our free photography tips and articles to stay current:


Leave a Reply