There’s always been a race between Photoshop and Lightroom when it comes to fine-tuning pictures. Just when I settle down for one of the programs and start using it regularly, I see something that makes me turn back to the other:
Today’s “switch back to Photoshop” reason: restoring shadows and highlights in a JPEG image.

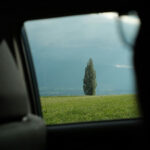
JPEG before retouching
If you want to make your photos more balanced, but you don’t have access to a RAW image, here’s what you need to do in Photoshop:
- You create a new layer.
- With the Paint bucket tool, color the entire new layer black.
- Change the Blend Mode of the newly created layer to “Soft Light”.
- To blend the new layer into the exposure, create a layer mask and make the new layer invisible.
- Go to Image -> Apply Image, make sure you select Layer: Merged, Channel: RGB, Blending: Multiply and Opacity: 100%, then hit OK.

JPEG image with highlights and shadows recovered
If you want to make the mask more specific, simply repeat the last step until your picture is perfect.
This is just one of the tricks you can do in just a minute in Photoshop—simple stuff that can make the difference in the final shot.
Like This Article?
Don't Miss The Next One!
Join over 100,000 photographers of all experience levels who receive our free photography tips and articles to stay current:


Leave a Reply