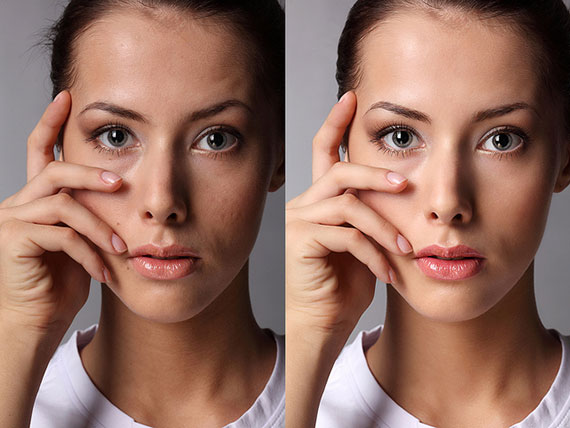
One of the most fundamental and most utilized skills of retouching portrait images with Photoshop is skin correction. Fine lines, discoloration, etc. are prominent, especially in closely framed shots, and they can make the subject feel insecure. The dilemma with skin retouching is that often the final product looks over-produced and fake.
The goal is not to erase the subject’s personality but to highlight the best features by minimizing distracting shadows and lines.
If there are specific areas you want to conceal, start by using the clone tool or spot healing brush on those places. Then, try this trick to achieve a soft, natural glow without turning the subject into a plastic doll.

Photo by Katerina Kruassanova
1. Open image in Photoshop.
2. Click and hold ‘Command J‘ to create a new layer from the background or combine previous layers for a cohesive slate by holding, ‘Shift, Option, Command, E.’
3. Click the ‘Filter‘ tab from the main toolbar and navigate to “Blur” → “Gaussian Blur”
4. When the pop-up box appears, make sure the preview screen is zoomed out enough to see your image. Increase the percentage blur until facial imperfections disappear, but not so much that facial feature distinction disappears. In most cases, I land somewhere between 18%–30%.
5. Click ‘OK.’ Your image now has a significant blur over it entirely. Don’t worry, we’re not done! At the bottom of your adjustments panel, click, ‘Add layer mask.’ A box will appear to the right of the blur layer. This is your mask. With the mask highlighted, click ‘Command I‘ to invert the box so that it is black and the image appears sharp again.
6. Select the brush tool and decrease the opacity slider in the layers panel to about 30–40%. This is up to your discretion, and it depends on the level of blur your want. For the most natural looking effects, I find that somewhere between 30–40% yields the best results for smoothing without looking overly retouched and allowing the skin’s natural texture to show.
7. Select a soft, round brush with 0% hardness and make it white. Zoom in on the features you want to smooth in your image (Command +) and with a small, circular brush tip, paint over the features. The areas you paint with the white brush will uncover the Gaussian blur on the black mask below your image. Only the parts you paint will reveal the softer texture, while the rest of the image remains sharp.
8. Once you are happy with the results, zoom out (Command –) and start a new layer to continue your edits (Shift, Option, Command, E).
I use this technique for editing almost all my close up portraits and often for wedding photography, as well. It is especially flattering, and once you get used to the process, it takes only a couple of minutes! I hope it works for you!
About the Author:
Leah O’Connell is a self-taught, professional photographer in Hawaii with a masters degree in English and Education (leahoconnell dot com). She loves writing, exploring, and using her creativity hand-in-hand for her job every day.
Like This Article?
Don't Miss The Next One!
Join over 100,000 photographers of all experience levels who receive our free photography tips and articles to stay current:


Excellent tutorial. Thank you for sharing this
It looks easy and as basic retouching I think this tutorial is pretty good.
Really nice tutorial: now I know how the hell plenty of photographers are doing the retouching wrong. Gaussian blur… Oh my God…
Excellent tutorial. An alternative to Portrait Prof.
No offense but this is terrible advice. There’s no quick way to retouch skin well in under 3 minutes. The method you show here leaves the skin looking plastic, gets rid of the contours of shadows and makes your image above look artificial. Tutorials like this make me think your whole site is a joke.