As captivating rivers, seas, and precipitation are to watch; they can be rather elusive to photograph. A master of the five elements, Mike Perea, knows a thing or two about capturing water. In this seascape long exposure tutorial, he shares his top tips on how to capture this unique and ever-changing landscape.
Pack The Right Equipment
For his seascape long exposure shoots, Mike brings along:
- A tripod to stabilize and balance images.
- Round ND filters to reduce exposure during long-exposure shots.
- A shutter release; either a plug-in device or an app
- His Nikon Z7 II camera, which features 30-second< long-exposure shutter speed options.
Stay Alert
It’s easy to get distracted when photographing just about anything, never mind the ocean. As soon your eye hits the viewfinder, you might as well be in another world. That’s why Mike warns photographers to keep another eye out for their gear and stay alert.
…first, never turn your back on the ocean. That’s how you get hurt, and that’s how you get your gear confiscated by the waves…
He keeps his backpack on his back or an elevated surface further away. That said, tides are something to be aware of, too — particularly when shooting on outcropped rocks. Mike uses the Magic Seaweed app to plot the rhythms of the tides — and avoid getting dashed on the rocks!
Take Lots of Photos
When dealing with such rough conditions — including biting winds, shifting sands, and unpredictable waves — camera shake is inevitable. Mike cheats by setting his camera to Continuos Hi. So it takes multiple shots, upping his chances of a sharp one.
A shutter release app or trigger device comes in handy here, too. Simply pre-set your camera and stand further away or stabilize your tripod. Mike also pushes his tripod as far into the sand as possible. That way, it will be less likely to sink when or if oncoming waves lap at the legs.
Blend Images
Remember all those burst photos you took? Well, they’ll come in handy for this next step! You see, Mike loves to blend more than one image to create unique compositions. He simply chooses whichever shots he likes most and thinks will work best together.
Then, combines them using photo editing software like Lightroom and Photoshop. Stacking various exposures to create a single composite image can yield awesome results. Sometimes, even better than the real thing.
Utilize Bulb Mode
Many cameras don’t offer shutter speeds longer than 30 seconds. As such, extended long exposures may be difficult to achieve. Most cameras do feature bulb mode, though, which you can use to set up those extra-long shutter speeds.
That said, if you do use this mode, your camera may not reflect simulated exposure values beyond 30 seconds. To solve this issue, Mike suggests using an app like Photopills to calculate your exposure values. You can input your test image ISO, f-stop, timer, filter, and shutter speed settings to get your estimated values.
Consider Your Lighting
Typically, golden hour and other well-lit (but not-too-bright) times of the day are ideal for photography. However, when shooting long exposures, you can leverage various types of natural lighting to get the best results.

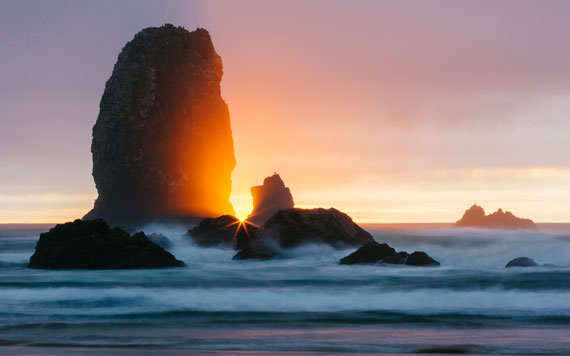
Photo captured by Dave Hoefler; ISO 100, f/32.0, 1.3s.
Flat, even light — including those slightly overcast days — are ideal for extended (1-minute< shutter speeds) long exposure shots. Black and white photography, especially, benefits from already semi-grayscale overcast lighting. Alternatively, when shooting typical seaside sunsets and sunrises, use shorter (>1 second) shutter speeds to compensate for the light.
To Conclude
Long exposure is an interesting photography technique that aims to capture movement in a single still image. Playing around with shutter speed and various other camera settings, as well as post-production editing, can yield stunning results. Follow Mike’s helpful tutorial and see what works for you.
Like This Article?
Don't Miss The Next One!
Join over 100,000 photographers of all experience levels who receive our free photography tips and articles to stay current:


