Getting great studio lighting in your portraiture doesn’t have to mean an intricate setup. And most times simplicity works best. All you need is a strobe or two and a plain, dark background. Gavin Hoey gives us a few simple tips to create appealing portrait lighting while keeping your model from blending into the background:
How to Shoot a Portrait on a Dark Background
A good studio setup requires no more than a single key light on a 30–45 degree angle and just off to the side of your subject. This creates a beautiful and defining light.
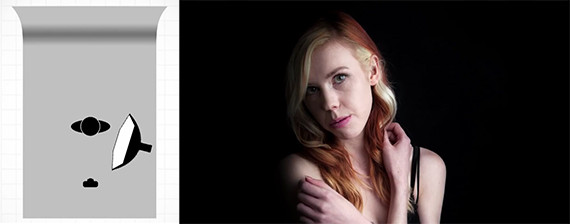
Single key light. Shot at 58mm, 1/160 second, f/5.6, ISO 100
However, shadows may start to blend into dark or black backgrounds. This is when adding a second light can really improve tonal definition.
A second strobe can be placed on the opposite side of the key light, facing the back of the subject. This “hair light” will illuminate the hair and define the outer edges of your subject that previously got lost in the dark.

Key light with a hair light. Shot at 45mm, 1/160 second, f/5.6, ISO 100
Pointing the strobe toward the background behind your subject will create distance between the subject as well as a intriguing glow.

Key light with background light. Shot at 50mm, 1/160 second, f/5.6, ISO 100
If you don’t have a second strobe, no problem! Simply move your subject and the key light closer to the background. When fired, the flash will illuminate both the subject and background!
Tip: Try using reflectors such as tin foil, white Bristol board or other shiny or bright surfaces in place of the second strobe. This will bounce light around and fill in some of those shadows or help brighten your background.
Post-Processing a Portrait Shot on a Dark Background
Your well-lit images may need a bit of post-production. Hoey quickly enhances his photos with minimal changes in a matter of minutes.
After opening the image in Camera Raw, he makes the reds in his subject’s hair more red by adding contrast in HSL/Grayscale mode. He also tones back the color in the model’s porcelain skin.
To repair an area of background, he uses the Patch tool (found under the Spot Healing tool). Draw a rough selection around the large object you want to patch. Click and drag the selection to other areas of the photo to match it appropriately.
- To darken the selected area, simply change the color slider option.
- To add more texture to the area, change the structure slider.
Voila! You are left with stunning images with professional lighting—without a whole lot of fuss in-studio or with your editing software.
Sometimes old clichés say it best: less is more. With this simple lighting setup and super quick edits, we have to agree!
Gear Used
Hoey used a Westcott Apollo Orb softbox for the key light, a Flashpoint StreakLight 360W for the background light and shot with a Canon 5D Mark II.
What are some techniques you use to make your subject stand out? Pass along your ideas and thoughts in the comments section below.
Like This Article?
Don't Miss The Next One!
Join over 100,000 photographers of all experience levels who receive our free photography tips and articles to stay current:





Thanks for this article !