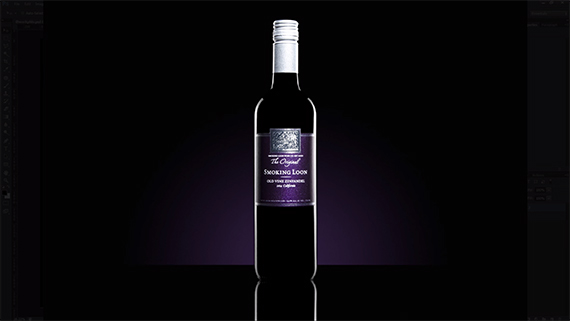
If there’s one thing photographer Dustin Dolby has mastered, it’s efficient workflow. His educational Youtube channel has accrued nearly 2 million hits by simply walking through his strategies for creating professional looking images with minimal materials. The feats he accomplishes sometimes seem to only be possible at the hands of a skilled professional, but with his guidance it suddenly doesn’t come off as such an impossible task. For instance, using a single speedlight Dolby was able to masterfully illuminate a glass bottle of wine.
Take a look for yourself to see how he manages to nail down this notoriously difficult subject in this step-by-step tutorial:
Setting Up the Studio
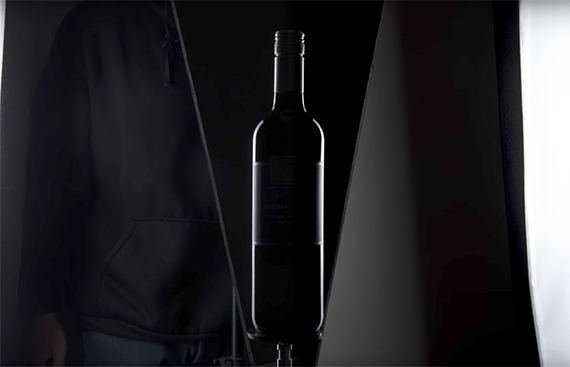
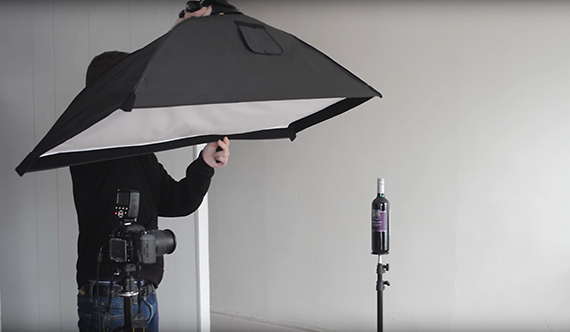
Dolby starts out by setting up a “strip light”—a strobe speed light equipped with a stand and an octabox to disperse light. Its primary purpose in this scenario is to carve out the edges of the bottle. Positioned to the side of the subject, it’s not meant to expose every detail of the bottle so much as it is meant to create a strong base highlight to work with. Once his light is set, he brings in a black board angled slightly away from the light. This serves two purposes. Aside from acting a solid backdrop, it will bounce light back to the subject and strengthen the edge highlight organically. He then proceeds to take his first exposure.
Afterwards, he sets up the same way on the other side of the bottle. By tilting the strip, it’s possible to control just how much the highlight wraps around the bottle. Dolby suggests comparing exposures to emulate the look of the first setup as much as possible, so as to create a sense of symmetry during the compositing phase.
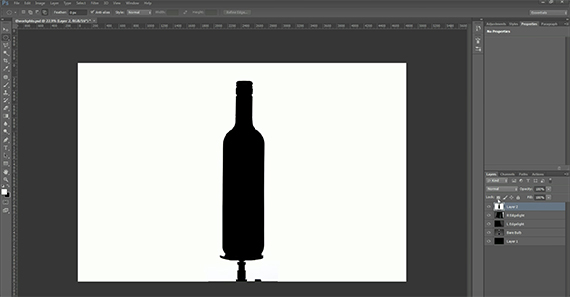
Once he’s satisfied with his exposures, he places the strip directly behind the bottle. The end result is a simple black silhouette against a white background. While simplistic, this exposure produces a perfect mask in post.
Before wrapping up in the studio, it’s important to capture a final exposure that renders the subject’s colors, textures, and minute details legible. Dolby holds his strip above the bottle to create an overhead light. However, those trying to recreate the look may not be able to do this. Luckily, a bare bulb exposure from straight on is enough to get the job done.
Post Processing
Upon entering Photoshop, the first thing Dolby does is create a clipping mask of the silhouette. Selecting the area surrounding the bottle, he then proceeds to invert and hit Alt + Delete to replace the bottle’s surroundings with white. Afterwards, to ensure that the remainder of the exposure melds completely with the white, he expands the boundaries of his selection by just a few pixels and repeats the Alt + Delete technique once more. Finally, using the elliptical marquee and the brush tool, he eliminates the stand used to hold up the bottle and recreates the bottom of the bottle all in just a few strokes.
Once the mask is established, it’s possible to start building the greater composite. Selecting one of the edge exposures, Dolby then applies a black mask equipped with a white to transparent gradient mask. This exposes the other lit side of the bottle, creating a clear highlight around the perimeter of the object.
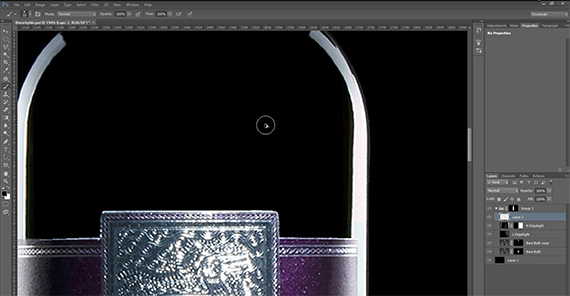
With the edges revealed, he then uses the bottle shaped mask to black out the background entirely, creating the sleek look of a product shot. From there, he moves to the last exposure to bring in the details of the wine’s cap and label. All there is to this is a crude selection and masking the remainder of the layer in black. With a linear dodge add filter, it’s easy to incorporate the selected parts into the final composition.
With the base composite finished, achieving a final product lies entirely in perfecting the details. At this stage, Dolby brushes out any abnormalities that may have slipped between the cracks. He also continues to mask small details to create further symmetry. As a final touch, he adds a reflection—a task as simple as making a selection, a copy, applying a vertical flip, and moving the mirror image to the bottle’s base.
Of course, it’s always possible to get more complex and detailed with this with this setup. For instance, once everything is said and done Dolby proceeds to create a faux horizon by inserting a back light matching the purple of the bottle’s label. He also adds a bit of noise to combat banding. But should you attempt this shoot, embrace your personal style. With hundreds of tools at your disposal, Photoshop certainly doesn’t stifle creativity. One of the easiest ways of establishing individuality as a photographer lies in the edits you make.
That’s all there is to it! Product photography can be intimidating because of how perfect it sometimes looks. As this tutorial shows, it’s not always about getting everything correct in camera on the first try. Rather, the sign of a great image maker is the determination and meticulous attention to detail it takes to combine many imperfect parts into something beautiful.
“Compositing is a very powerful method for augmenting our abilities in the studio. With a single speedlight, it is easy to fall into the trap of having your photographs end up flat. By compositing multiple exposures together, we capture dimensional imagery.”
Like This Article?
Don't Miss The Next One!
Join over 100,000 photographers of all experience levels who receive our free photography tips and articles to stay current:



Could the green be the actual color of the bottle?