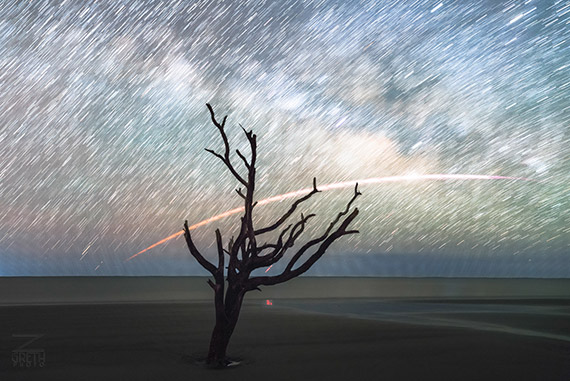
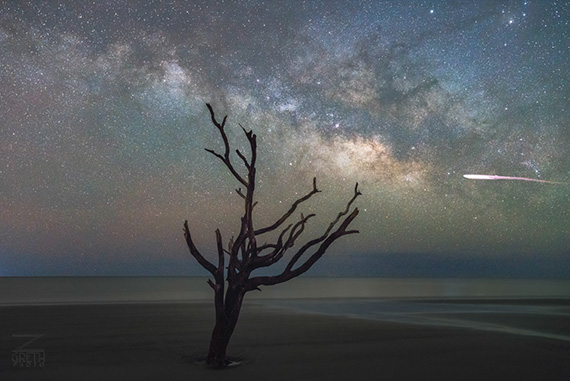
What you see here is the 2nd Stage Burn with the 1st Stage Re-entry Burn, which is used to initially slow down to begin the landing process, appearing under the tree limb.
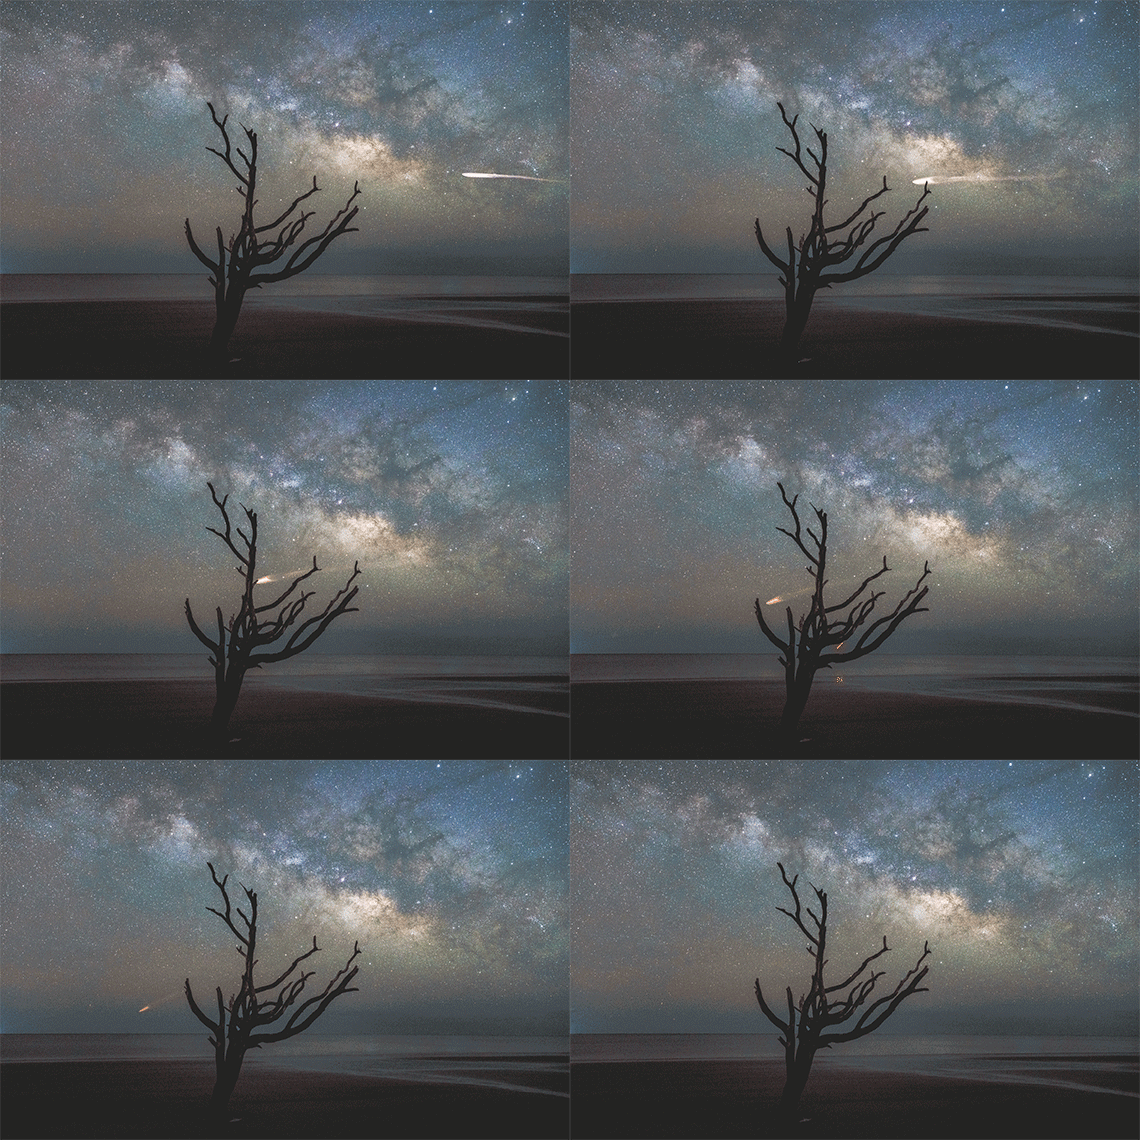
During a past launch, at 1:21 am SpaceX continued its run of aerospace brilliance with a night mission of its Falcon 9 rocket, carrying its Japanese communication satellite payload to geostationary orbit. The most spectacular portion of this event was the first successful night landing of the Falcon 9’s first stage onboard their floating platform called “Of Course I Still Love You.” While this was not the first successful landing for SpaceX, it was the first one at sea at night and also one that they predicted to have a high probability of failure due to the dynamics involved with the much higher energy needed to send the satellite to a higher orbit than previous launches.
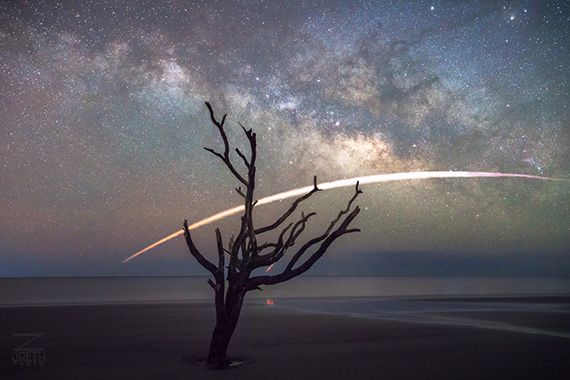
What does that have to do with me? Well, at the time, I was on Hunting Island in the southern portion of South Carolina doing what I love to do, shooting the Milky Way…. and I captured the moment!
This was my 3rd time out with my new gear, the Sony a7R II and Zeiss Otus 28mm f/1.4 and I can’t tell you how ecstatic I am with both of them in this early honeymoon stage, as they are providing me with the sharpest, most beautiful night skies I’ve ever seen without using star tracker equipment.
This was very reminiscent of my capture of the International Space Station a couple of years ago. If you’ve followed me at all you might remember the night I went out to shoot star trails above Weaver’s Needle in the Superstition Mountains just outside of Phoenix, Arizona, and the ISS photobombed me. Maybe I have a knack for being in the right place at the right time.
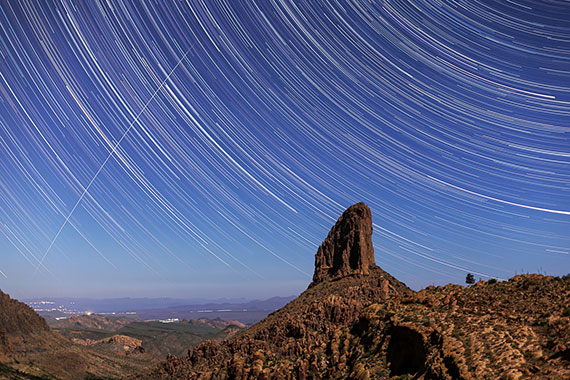
Weaver’s Needle and the ISS
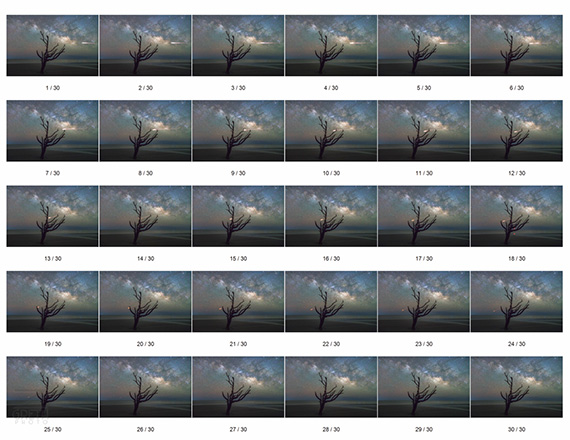
My current method of nightscape shooting involves capturing a series of images and then doing some advanced stacking techniques in Photoshop to remove the noise (rather than using Adobe or other 3rd party noise removal software) and Sony’s mirrorless line of cameras has a decent application that you can install directly on the camera (called Sony PlayMemories Time-lapse) that allows you to automatically capture a series of images, like I want, without having to resort to an external intervalometer. I’m all for less gear, so I’ve been doing it this way for a few weeks now. The downside is that the minimum number of images the application allows is 30, and while that’s more than I need, it still works out to only about 5 minutes of shooting (I’ve settled into 10 second exposures with my current setup) and I’m never going to complain about having extra data just in case.
Sorry for the sidetracking there, where was I? Right. I got out of my tent around midnight as the Milky Way was beginning to rise to the east and headed down to the pitch black beach where there is a plethora of trees slowly getting swallowed up by the sea. It’s an incredible environment to shoot in, but there’s a little wrinkle in all of this and it has to do with turtles. This time of year is sea turtle season in the southeast and the threatened turtles that come up on the beach to lay their eggs (and any little ones that hatch) are highly sensitive to light and often get turned around and disoriented by lights on the beach. For that reason, South Carolina (and presumably other states in the area) has instituted a no lights on the beach policy. Luckily there’s enough light pollution that you can at least navigate without a problem, but not being able to use a flashlight to help with focusing, adjusting camera settings, etc., is a bit of an annoyance. I’m all for helping the turtles though, so I fully support this mandate. And the Sony a7R II is configurable enough so that you can view everything through the EVF. After adding some gaffer’s tape to the lights on the outside I’m able to operate in complete no-light stealth mode.
Capturing the Moment
At around 1:10am I set up by a particular tree that I was interested in and started capturing data for an ISO invariance test, unbeknownst to the countdown happening 250 miles to the south. Since I was still new to the Sony a7R II, I wanted to know what its sweet spot was for ISO settings. I’ve been using ISO 6400 almost exclusively (with some minor exceptions on particular nights) with my old Canon 5D Mark III, but I expect that the Sony can shoot higher without any problem. I still need to work up that data, but it’s coming soon. Since I was already set up on a tree that I sort of liked, I figured I might as well capture my normal Milky Way data. So at 1:17am I turned on the Sony PlayMemories Time-lapse app to fire off 30 frames with a 1 second interval. I stepped back, looked up, and let the sky take me in for five minutes while my camera did its thing. As the camera slowly ticked down to its final few frames, I saw out of the corner of my eye what looked like a firework going off in the distance. I could make out a vertical red trail going straight up to the south of me. From the horizon, it was maybe a couple of fists tall before it disappeared and my timelapse completed while I shrugged my shoulders, wondering.

As I stood there thinking, I remembered two other guys were out shooting as well and I initially thought that maybe they were playing around with a drone because I knew those typically have red lights on them. But I stood and watched for a few seconds and even though the red trail was gone, I could still make out some movement in the sky. It was very reminiscent of a satellite in orbit so I got to thinking that maybe, just maybe, it was some sort of rocket launch. Too bad it was almost due south and I was facing to the east. So I stood there dumbfounded… and waited for about two minutes before I came to grips with what was unfolding. The rocket was no longer going up, but had made a turn and was maneuvering towards my frame. Without hesitation, I hit the shutter button and started another 5 minute timelapse.
By the time it was complete, I could tell that the rocket was long gone. In my haste, I grabbed my tripod and set out to find the other photographers to see if they saw it too. In hindsight, this was a mistake. I always try to take a couple of longer, lower ISO, higher f-stop images with the foreground in focus so that I can blend it in later in post. It always make a more pleasing image when everything looks in focus. So yeah, when I got home and realized that I forgot to do that, I was a little frustrated in myself. But luckily there are some (limited) ways around it, which I’ll get into.
Processing the Image
The next morning, I groggily got out of my tent and drove home to recharge my batteries and see what I had captured on the big screen. The first step in the process is obviously importing the images into Lightroom. I’m running things on a Surface Pro 3 i7 with a 256 GB SSD and 8 GB RAM. I love it for just about everything except image processing. With my old Canon, RAW files were only around 29 MB per file, and it did a rather admirable job in keeping up with my workflow. But the 42MP Sony a7R II RAW files are clocking in at 84 MB per file. If things are settled down, previews have been created, and I’m not zooming in and out constantly, Lightroom can handle it, but the fan kicks in quite a bit and we get to take plenty of breaks while it thinks about things. Taking it one step further, most of my image processing is actually done in Photoshop after I do my initial RAW editing in Lightroom, and once you multiply 84 MB by 30 images, well you’re talking a couple of gigabytes of files in Photoshop, and the short breaks turn into long ones. So it looks like a dedicated desktop mega-editing workstation is in my future, but that’s neither here nor there. Back to the image processing….
First I edit in Lightroom. I don’t want to take away any thunder from working pros who put out impressive video tutorials on how to process images in Lightroom, so I’ll leave that to Google (or I can make recommendations). Here’s what the first image looks like after I complete this stage. I try to mainly focus on the sky with a little bit of shadow recovery in the foreground. I know I can do a little more fine tuning in Photoshop, so I just try to get it close at this point.
Then I sync the settings to all 30 images.
Finally, I highlight them all and right-click on the first one, click Edit In -> Open as Layers in Photoshop. The first thing I usually do at this point is to highlight all of the layers and set their blending mode to Lighten. This allows the brightest part of each layer to shine through to the layer above it. In landscape astrophotography terms, it creates the star trail effect.
Over the course of five minutes of shooting, the stars are moving through the sky. In reality, the earth is rotating on its axis, but from our perspective, it’s the stars that are moving. If I were looking for true authenticity in my final image, this would be where I would start. But as I looked at it, I decided to deviate a little. The star trail portion of the image was too much because the Milky Way is such a dense part of the sky. My goal was to represent the rocket trail and I felt that the smeared look of the Milky Way was too distracting of an element. I realize this might ruffle some feathers, but at the end of the day I’m trying to create an image that tells the story I want it to tell. And I wanted to tell the story of a rocket launch. So I decided to ditch the star trails and show the rocket launch as an overlay on a clean Milky Way sky. My image, my choice. Here’s my plan:
- Clean up the foreground
- Clean up a single Milky Way image
- Clean up the rocket trail
- Combine (1), (2), and (3), add magic pixie dust, crack open a beer and smile at my creation
Foreground
As I was saying earlier, I screwed up. I forgot to take an in-focus shot of my foreground. Not that it would have been easy. Over the next two nights I continued to struggle taking in-focus foreground shots due to the no-lights-on-the-beach mandate. Trying to yoga-ize myself into a position where I could see through an EVF that was low to the ground and pointing up at the sky was painful. And then trying to make out detail on a tree limb in pitch blackness was near impossible. Anyways, that’s not part of this story. I found out a way to get some sharpness out of an out-of-focus image. It’s not perfect, but for an image that has a lot of noise and darkness in it anyways, I can get away with it. That and the tree isn’t the point of the image, so you really shouldn’t be looking at it in the first place.
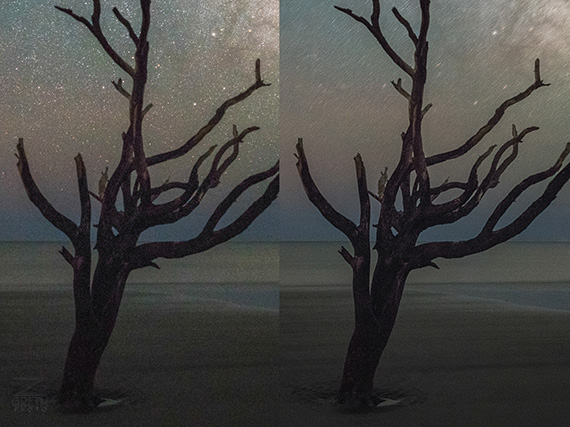
To do it was pretty simple. I took the first frame out of my layer stack and applied an unsharp mask and high pass filter to it. Then, to complete the foreground process, I took the top four layers, made copies, converted them to a smart object, and then applied a median stack filter to it. This does a fantastic job of eliminating noise and smoothing things out. Here’s a before and after of the tree and surrounding beach. I think it’s a remarkable improvement on the foreground.
To finish the foreground, I also used Nik’s Dfine noise removal software (Google made all of the Nik tools free, download them!) to do just a little bit more. It was very minor, but I knew it needed a little more. I also planned on adding this filter to the Milky Way so that the whole image would match up. The hardest part of this process is usually trying to get the foreground and background to match up without there being a distracting demarcation line of no-noise to lotsa-noise.
Milky Way
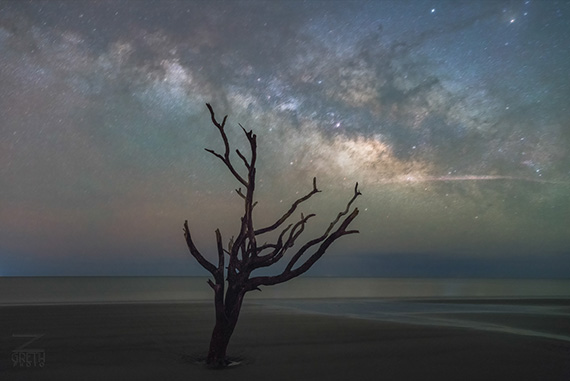
Most of my Milky Way processing is initially done in Lightroom, so for the most part it’s already complete by the time I get here, though there are some additional color, curves, levels, and brightness adjustments that I tend to do in Photoshop to finish all of my images. At this point, there wasn’t much that I did because I knew I’d be doing more once the rest of the image was put together. But to be fair, and to show where I started, here’s the first image in the stack that I used as my base Milky Way image with the clean foreground masked in.
Rocket Trail
The Falcon 9 rocket raced through the sky for at least 7 minutes before disappearing from view. If you’ve been paying attention, you know that I missed the first 2 of those minutes. But, there’s a reward at the 6 minute mark… the landing, or at least the landing approach, of the first stage of the Falcon 9 rocket. As the rest of the rocket continued to motor on to orbit behind the second stage, the first stage dropped off and successfully landed on a floating platform out at sea. How cool is that?
Props to the SpaceX sleuths on Reddit for determining the high-probability that this is just the re-entry burn. However, they also deem it to be remarkable that it was visible from over 700km of atmosphere.
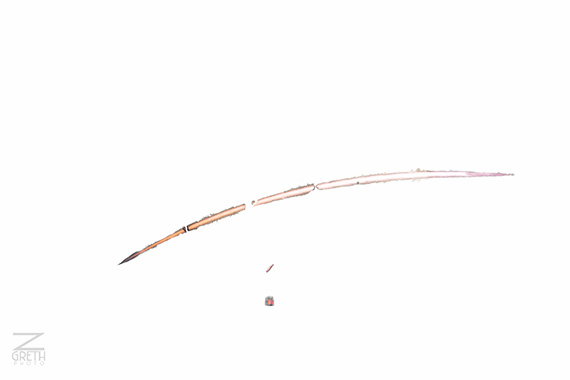
This is probably the final part of where I used my personal creative freedom in creating my image. The drawback to shooting multiple frames instead of just doing long five minute exposures is that there is a short delay between frames where the camera is clearing the buffer and starting the next exposure. When you combine the layers, you’ll see those gaps between star trails and, in this particular case, the rocket trail. Because of how bright the rocket trail is, I knew I had to fill in the gaps to make it look right. So after some careful clone stamping on each layer to extend the trail over the gaps and then some more extremely careful masking to just select the trails out of each image, I was able to come up with a layer that looks like this, only without the white background. One thing to note… I am TERRIBLE at masking. I don’t want to hear any comments about that. I already know it and need to work on it. It doesn’t really show in the final image because the sky gets put back in behind the rocket trail, but still. It’s a part of the image that I’m not totally proud about it.
The Final Image
The final step in the process is to combine all of the elements and clean things up. The base layer was the Milky Way from the first frame, with a Nik Dfine filter applied to it to smooth out a very small amount of noise without totally degrading the image. The Sony+Zeiss combo is extremely sharp and the noise is well within the bounds of being acceptable and pleasing, so I didn’t need to do much. Then I added two Color Balance adjustment layers, one to the whole layer and then one to just the sky to balance the color out.
From there, the rocket trail was added back in as well as the new foreground layer that showed a little bit more detail in the tree. I added another Color Balance adjustment layer to only this foreground layer since it had a little bit of a color difference from the bottom layers and I wanted to bring it back in line.
The final adjustments were global without masking anything and were a Vibrance layer (added some vibrance, subtracted some saturation) a Brightness/Contrast layer (added a little brightness, subtracted a little contrast), a final Levels layer where I pulled in the white and black points to extend the image to both ends of the histogram and add some extra punch to it, and a light vignette because I like vignettes sometimes.
Final Thoughts
I figure this will probably get lost in the 2500 words above it, but the whole point of this is not to show you how to process your own image, but to give you an insight as to my thought process when I’m processing my images. The specifics of each step won’t help you, but hopefully you’ll come to realize that you’re probably having the exact same conversations in your head that I usually am. And at the end of the day, it’s your story to tell… and this was mine.
Now if you’ll excuse me, time to crack open a beer.
About the Author:
Zach Grether is a photographer who hopes his images will help preserve the night sky in a matter fitting of its greatness. Follow him on Facebook, and Instagram.
Like This Article?
Don't Miss The Next One!
Join over 100,000 photographers of all experience levels who receive our free photography tips and articles to stay current:




Leave a Reply