Topaz Adjust includes tools that work on color, curves, detail, noise and exposure manipulation. Local adjustments can be made with brushes that dodge, burn, smooth, and mask out. In the opposing left panel, photo effects organized by collections composed of pre-made settings, or presets, can be applied to your photo; ‘Exposure Correction’ ,’Detail Light’, ‘French Countrysid, ‘Spicify’ and ‘Light Pop Grunge’ are to name a few. At the end of the workflow, finishing touches can be added, such as a vignette, grain, or border.
With an array of offered components, here are ten features that you should know about in Topaz Adjust:
1. Adaptive Exposure
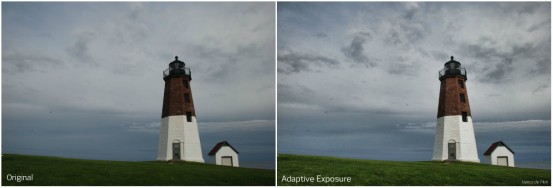
The core technology behind the program, this feature allows you to balance your image’s tonal values, enhancing local contrast and dynamic range as well as recovering detail from blown out highlights or blocked up shadows. Useful tip: increase the regions slider for higher variations of color, detail and appearance of depth of field.

Adaptive Exposure
2. Details
A basic tool for enhancing unseen details or suppressing those you wish to be removed. Sharpen up an image before sending it to print or reduce detail on a portrait to soften skin. Useful tip: don’t forget to check ‘Process Details Independently’ so that exposure adjustments are applied separate from detail.

Details
3. Color
Excellent for saturation boosts and hue adjustments. This panel uses the same technology as the adaptive exposure tab, except with color. Intensify dull, flat colors, or alter the hue to affect mood.

Color
4. HDR Collection
This set of effects contains pseudo HDR-like presets that will make your image ‘pop’. Just don’t overdo it (see #8 for Transparency or #5 for Brush Out tool).

HDR Collection
5. Brush Out Tool
Brush (or mask) out areas of your image that you don’t want to be affected by applied adjustments. Change the brush size, opacity, hardness and edge aware for the most precise brush. Works great to bring back in a sky that has been botched by applied effects. Fun tip: reduce your image’s saturation to 0 and brush back in selective color.

Brush Out Tool
6. Noise Removal
If your image already has noise artifacts, or you start to see them appear as adjustments are made, use this tool for basic noise removal. Particularly useful on skies, high ISO and cellular phone images.

Noise Removal
7. One Click Adjustments
Because sometimes that is all it takes. The image below was transformed with the Vibrant Collection’s ‘Dramatic’ preset.

One Click Adjustments
8. Transparency
If an applied preset is too bold, its opacity can be reduced to blend back in the original photo.

Transparency
9. Basic Borders
Because who doesn’t love a classic border?

Basic Borders
10. The Apply Button
With Adjust you can apply multiple effects on top of each other during a single session. The after image shown below was created by applying these presets: Dynamic Brightness, Brilliant Warm, Detail Light, Mild Contrast Pop, Painting Venice.

Apply Button
Learn more here: Topaz Adjust for Post-Processing
Like This Article?
Don't Miss The Next One!
Join over 100,000 photographers of all experience levels who receive our free photography tips and articles to stay current:


But a real HDR from 3 photos take with -/0/+ EV…Topaz could make?
oh nice
Nice, concise set of functional highlights for Adjust.
I am really liking the results I can get with it exporting from Lightroom.
Quite satisfied though I wish the sliders “remembered” their initial settings.