Photographers talk about white balance and color temperature a lot, but what do the terms mean, and why would you choose one setting over another? They can be a confusing topic for some, but in this video Pye Jirsa breaks down the basics of these tools and gives some concrete examples of how to use them for greater creative control:
1. Color temperature is simply the color of the light source
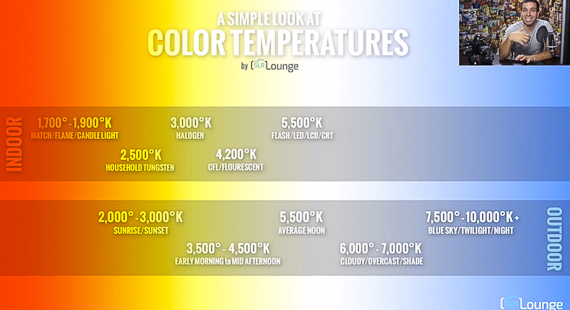
Every type of light has its own color and this is measured in units of kelvin. On a spectrum from red to blue the light source determines the temperature.
For example, candle light or flames can have a warmer or reddish orange tone whereas a cloudy day or twilight can be a cooler blue. Strobes and flashes are meant to be a neutral white and are balanced to noonday light. When we talk about white balance we’re just talking about the setting in the camera, so it knows what should be white.
2. Some lights have a tint
Office lights, like fluorescent tubes, may be energy efficient but the light’s wavelength spikes on green and can have a bit of a green tint or hue. This is something you can easily fix in post production with Lightroom or Photoshop by increasing green’s opposite color, magenta, to balance the tone.
3. Set the white balance on your camera
Most cameras give you a few options for white balance whether it’s indoors, tungsten, or shade. The camera also gives you the option to choose an auto white balance setting, but this is not always effective and usually only works accurately outdoors. Higher-end cameras typically allow you to dial in the kelvin setting you want, which gives you a lot more control.
4. Use live view to choose your white balance
In live view you can see what you’re about to photograph as it will turn out once the shutter releases. If you can dial in your white balance setting using units of kelvin then you can choose the right white balance just by looking at your screen and scrolling up or down until it looks right.
5. Shoot in RAW format
When your image is in RAW, the camera saves a lot more information than when you shoot in JPEG. This means you can change your white balance to correct the color temperature later in post processing. If you shoot in JPEG, you lose a lot of control and can’t adjust the white balance as effectively.
6. White balance can be a creative decision
There are some situations when your white balance can just look “wrong,” but for the most part you can just choose whatever suits your taste. You can cool a photo down by making the color temperature cooler giving it a blue tint or you can warm it up to make it more yellow and give it a warmer ambiance that may reflect the mood better. These are creative decisions a photographer can make that give them more control over their final product.
Like This Article?
Don't Miss The Next One!
Join over 100,000 photographers of all experience levels who receive our free photography tips and articles to stay current:


Leave a Reply