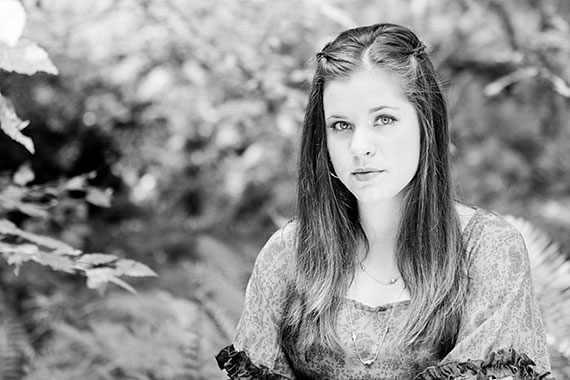
We’ve discussed showing less skin and using long sleeves on our models to avoid the viewer’s eye being pulled out of the frame. Why? We want all of the viewer’s attention to be focused on our subject. We want the subject to be the undisputed star of our photo.

Photo by Chasity Brighton; ISO 200, f/2.8, 1/200-second exposure.
Your background can also be a contributing–or detrimental factor. If we have a background that is too loud or busy, it can (and does) pull the eye away from the subject. The viewer’s eye is bouncing all over the place and rarely settles on our star. In fact, our star often becomes the background.
I frequently see this in senior portraits. The photographer is trying to make the senior look cool (Does anyone use the word cool anymore? I’m really dating myself.) and thinks that a wild backdrop will do the trick.
It doesn’t do the trick–and those are the photographers who are never able to capture the imagination of the senior–or more specifically the bill paying parents. And they are soon out of business.
While you DO want to have personal elements in a photo, they should all be there to support the image, not draw the eye away.
Often we will be shooting a large family grouping and with so many people AND a busy background, the individuals simply get lost. Use a plain, unfocused wash of color in the background to put the emphasis back on the group. People are going to look at the finished photo and say, “WOW, You did that?”

Photo by Philip Brookes; ISO 500, f/5.6, 1/250-second exposure.
So for today, I’m recommending you use a less cluttered look in your photos. It will take the attention away from your background and put it onto your stars where it belongs.
Don’t forget the foreground – if it is cluttered, change it.
What if we are at a park and can’t change the background?

Photo by Werner Wilmes; ISO 500, f/5.6, 1/1600-second exposure.
What is depth of field?
That’s when we start to consider depth of field. Here a simple and admittedly basic explanation of depth of field:
A lens can only sharply focus on one place at a time. This will give you a photo with perfect focus on one spot and acceptable focus for a little way in front and a little way behind. This area of acceptable focus is called the depth of field. The zone of sharpness varies by lens, focal distances and so on, but as a rule of thumb, you can think of the zone as being about 1/3 in front of the subject and 2/3 behind. That’s measured from the distance between the lens and the focal point.
Depth of field is how you get those gorgeous photos with the subject being shown sharp as a tack, yet the background is nothing but a total wash of unfocused color. It DOES force the viewer’s eye directly to our star.

Photo by Federico Racchi; ISO 100, f/2.2, 1/1250-second exposure.
Depending on your lenses and shooting distances, depth of field can vary widely. I’ve seen the depth of field go all the way to the horizon in landscapes–and I’ve seen a photo of a fly’s eye that was out of focus in both the front part and rear part of the eye.
Get out there today and experiment with your various lenses and shooting distances so you can master depth of field. It will be one of the most used concepts in your photo arsenal.
About the Author:
Dan Eitreim writes for ontargetphototraining.com. He has been a professional photographer in Southern California for over 20 years. His philosophy is that learning photography is easy if you know a few tried and true strategies.
Like This Article?
Don't Miss The Next One!
Join over 100,000 photographers of all experience levels who receive our free photography tips and articles to stay current:


Nice capture the last one. Just a pity that the woman has her face covered by the hat.