Taking great vineyard images can be challenging. Pictures can turn out blurry, have sunspots and lighting issues or just have nothing to distinguish them from a million other shots. These five tips can help correct the most common of these problems and provide you with some amazing and unique vineyard images.
“Dad in the Vineyard” captured by Jim Fisher1. Go Out When the Lighting is Even
The best time to take pictures in the vineyard is when the light is soft and even—usually early in the morning right after sunrise and then again around sunset. What you want to avoid is the harsh light that is cast when the sun is high in the sky.
Believe it or not, overcast days (if light enough) can allow you to take pictures all day because the clouds diffuse the intense sunlight, giving you the even lighting you need.
2. Detect & Remove Distractions
One bad grape in an otherwise perfect cluster, a huge brown leaf in the middle of a group of green leaves, or a post running through a series of vines are examples of distractions that can draw the viewer’s eyes away from the main focal point of your image. These distractions will dilute the impact of your picture. If you identify these distractions beforehand and remove or find a way to minimize the problem the result will be a more perfect picture.
For example, if there is a brown leaf blocking your intended target, go ahead and remove it (once you have determined that removing the first distraction will not expose a larger one, such as a gaping hole in the vines or dried out grapes). If there is a weird vine twining around the cluster you want to photograph, try to re-route it to either side.
Next time you see the perfect shot, take a careful look around to see if there are any potential distractions—and then do the best you can to take care of them before they get into your final image.
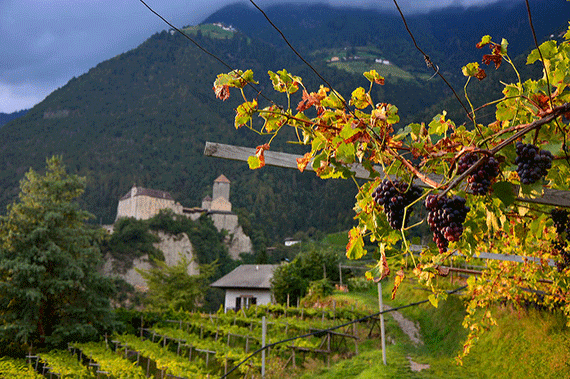
Photo by Justin LaBerge; ISO 100, f/4.2, 1/100-second exposure.
3. Use a Monopod to Get Rid of the Shakes
If you have a difficult time keeping your hands steady while taking pictures, then you probably have a lot of shots that are blurry and out of focus. Although a tripod will help steady the camera, you lose much of your mobility and may have difficulty setting it up in all the places you’d like. A wonderful compromise is the monopod.
A monopod is simply an adjustable pole with a camera attachment at the top. With only one leg, it is very easy to carry around (you can even use it as a walking stick) and when you see the perfect shot, just plop the foot on the ground and use the pole to stabilize the camera, adjust the height (if necessary) and take the picture. In seconds you have your shake-free shot and can quickly move on down the row. Even better, they are relatively inexpensive.
4) Look for Clouds, Colors, & Other Effects to Make Your Images Stand Out
While wandering the vineyard, look for effects that will add interest to your image such as cloud formations (clouds are my favorite), colors, water droplets (you can even bring a spray bottle and lightly spray a few clusters) and so forth. One trick I use to add a little color to my grape images is to crouch down and shoot up through the cluster so you can get a glimpse of sky through breaks in the vines.
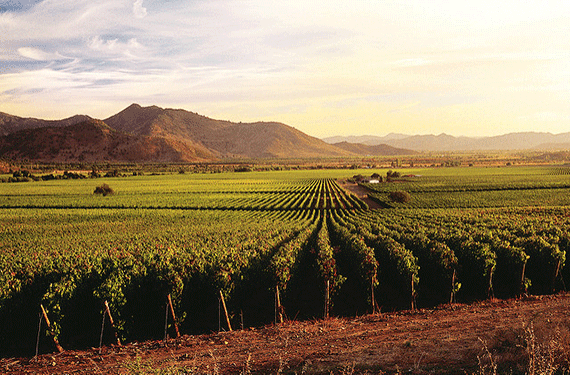
Photo by Viña Caliterra.
5. Have Patience!
Take your time while walking the vineyard and really look around. Is there a beautiful cloud formation that will be right over the vineyard in a few minutes? If so, wait until it’s in the perfect position and then take your shot. Perhaps there are colored streamers in the rows that fan out when the wind blows; wait until they are all fanned out and then take your picture. The main goal is to pay attention to the life in the vineyard and try to use it to improve your images.
About the Author:
Rachell Coe is a professional wine industry photographer and her photos have won awards, been published in magazines and books and used internationally as wall art, calendars and postcards. Check out her gallery at http://www.4thegrapes.com/PhotoGallery.
Like This Article?
Don't Miss The Next One!
Join over 100,000 photographers of all experience levels who receive our free photography tips and articles to stay current:



I thought that it was interesting when you said that one thing to consider when you are planning to take pictures at a vineyard is to make sure that only living vines are present in the photos. I have been thinking about having my bridal pictures taken in front of a vineyard but I have been worried that there would be dead brown leaves present in the pictures. I would be sure to remove any dead foliage so that only living vines were showing in my pictures.
Helpful tips but regarding #2 – Please do not touch the vines without explicit permission from the owner and never pick the grapes. I’m sure that you know that but want to make sure that beginning vineyard photographers know that as well.
Question…I’m heading to Napa soon & would love to know if you recommend any specific settings to use or pay attention to? I have a Nikkon P100 camera. Any tips for the amature photog would be greatly appreciated! I would love a handful of really amazing photos :)