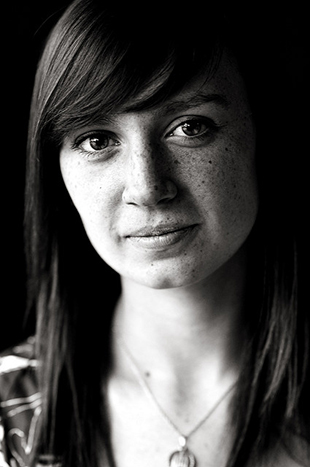
Have you ever tried to create a lovely portrait but didn’t know how? It’s not hard to create a beautiful portrait. The secret is the lighting. You don’t always need thousands of dollars in photographic lighting equipment to create a good portrait. In fact, all you need is a window.

photo by Eric Ward
If window light is so good, why doesn’t everyone use it? Well, the answer is that they don’t know how. Many enthusiast photographers don’t work with the light properly.
Many inexperienced photographers stand in front of the window. They position their subjects with their backs to the window. What they should be doing is using the window light to light the subject’s face. Sounds easy, doesn’t it? So why don’t more photographers light portraits this way?
The simple answer is they don’t understand light. The difference between a photography enthusiast and a professional photographer is a solid and very deep understanding of light. If you’re an enthusiast, don’t feel bad. I will help increase your understanding.
Quality of Light
First, in order to create beautiful portraits, you need to examine the qualities of light.
Think about the quality of the light coming through the window. Is it hard or soft? Usually, the light is soft. A portrait looks fantastic when the light is soft. Blemishes are reduced, skin tone evens out, and there are no harsh shadows under noses or eyes. It’s really an ideal kind of light for portraits.
Think about the temperature of the light. Changing the white balance to suit your portrait is essential if you want to create beautifully warm and fresh skin tones. It’s easy to create unsuitable color tone through a lack of understanding about white balance and how it affects your model’s skin tone. In this case, do a custom white balance before you shoot.

“Face Lift” by Shovona Karmakar
The way to do a custom white balance is as follows:
Take your light meter and place it on the subject’s face. Face the light meter toward the window light with the invercone extended. Now take a reading. Make sure the light meter and the camera have the same settings. For example, if the light meter tells you that f/1.4 and 1/60 of a second is ideal, and your lens is unable to go to f/1.4 then you may not use the setting. Move your light meter’s dial to the aperture you want to shoot at. It will then give you a reading you will able to set on your camera.
Now that you have the ideal exposure, take a grey card and place it in front of the lens. Set your camera to the settings of the light meter. Take a photo. Set the photo of the grey card to the correct white balance on your camera. Now your white balance should be OK. It’s been set for the shooting conditions.
The direction of light is very important, too. It’s good to get a window that is quite long so the majority of light comes from the person’s top and side, not directly from above. If you have too much light from above, shadows under the nose and the eyes may occur. To avoid this, try and find a window that is quite large. This will help disperse the light evenly.
If you find that you still have too much shadow on the opposite side to the window, try using a reflector. A reflector can bounce the light back onto the person’s face to fill in the shadows. This works very well in some situations.
If you place your subject too close to the window you may see more contrast on his or her face. If you want softer light and fewer shadows, move your model away from the window. This will even out the light across the face but darken the overall exposure. Simply adjust this by increasing your ISO.
When shooting a portrait using window light, it’s important to keep the emotive effects of that light clear in your mind. A soft light cast across someone’s face can often be endearing. This is ideal for weddings, young people, and children. If you want to create something theatrical and moody, try a different direction and quality of light. However, for windows, you will find that creating an endearing effect is easier than you think.

“Keep Calm” by Pirjo-Leena Bauer
Consider window light as a wonderfully accessible way to shoot portraits. Always make sure you have plenty of light, and use a tripod. Window light is soft and subdued and ideal for portraits. Face your model toward the light, not away from it. The light needs to caress the person’s face to help create a gentle and soft look and feel. If you use window light in this way, you will be better equipped to handle many lighting situations.

“Her Usual Celery Juice”by by Olga Filonova
About the Author
Amy Renfrey writes for DigitalPhotographySuccess.com. She’s photographed many things from famous musicians (drummers for Prince and Anastasia) to weddings to portraits of babies. Amy also teaches photography online.
Like This Article?
Don't Miss The Next One!
Join over 100,000 photographers of all experience levels who receive our free photography tips and articles to stay current:


Nice article!
Getting natural light is the best for portrait photography.
Thanks for sharing!
Except for the first photo, which model is looking out the window, are windows used as side lighting?